Shop Products
Houzz Logo Print
mowers_gw

Tub Valve Question

mowers
13 years ago

I was going to post this on the plumbing forum, but you folks seem to have the bathroom forum rocking.

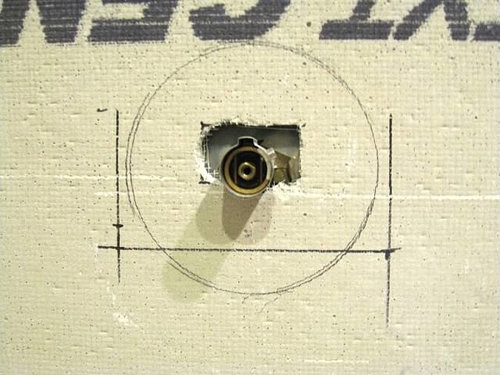
Question, I am doing my bath myself, and installed a moen valve. In the instructions it called for an installation of a plastic trim piece which I see no purpose for. So when I cut my cement board, I made it fit the valve stem and did not blast out a huge whole. I know it will be covered with the eustcheon (spelling), but it seems the smaller hole is better for prevention of water issues. Any advice if my rationale is correct before tiling?

Picture as it is now, not a pretty hole, I enlarged it so I can stick a needle nose plier in and get the "pin" out to pull the valve stem guts outs. I guess I can let the tile hang over the open portion a bit to neaten it up.

Plastic cover if pushed in correctly would require a hole that size:

Comments (18)

  • pricklypearcactus
    13 years ago

    When I put the cement board over my Moen shower valve, I also was uncertain about a hole that big. I followed the directions. There are screw holes that hold the trim on. Obviously those need to be accessible. To me, it does not look like your screw holes are, but it's difficult to tell by a photo. I'm not certain exactly why they suggest making the hole that big. The trim piece definitely covers the large hole.

  • mowers
    Original Author
    13 years ago

    I would need to cut along the pencil lines in the first picture and the plastic piece would slide back into the cement board hole, but again, what does this thing do other than make a large hole. The estucheon covers the hole by about 1/2". It just seems like more tile behind the estucheon the better.

  • homebound
    13 years ago

    Mowers, what do the directions say?

    In general, you're right about wanting to keep the hole as small as possible. In fact, it should be smaller than the gasket on the back side of the trim plate (so the gasket presses against tile, not an air space).

    As for that white thing, not sure, but some mfr's have one that goes BEHIND the wall, such as when a fiberglass shower unit is used and it would be too flimsy to install the ring without it.

    Other mfr's sometimes have a ring on the front side, and the trim plate clips onto it (such as when the trim plate does not have visible screws).

    In fact, maybe that's an optional piece for fiberglass units, but you need to find out.

  • homebound
    13 years ago

    I just noticed in the pic that it reads "must be flush with finished wall". No idea why, but if that's what they want...
    One reason might be to ensure there's a hole large enough to access the valve for repairs later on.

  • mowers
    Original Author
    13 years ago

    It says to install but no reason why. It does mention it should be flush to finished surface. If it is used so one can figure out how deep in the wall to install the valve that is silly, you can do that with measuring...why make a huge hole. There was nothing in the large round area that would require maintenance, other then the valve stem area, which allows the guts to be pulled out, but that can be done now without the large hole. If you look inside the stem you can see 2 vertical brass lines...that is a pin you pull upwards so you can remove the valve for repairs.

  • kudzu9
    13 years ago

    mowers-
    Why not call up Moen Consumer Support and hear what they have to say? I've found them to be very helpful in the past.

    (P.S.: it's "escutcheon.")

    Here is a link that might be useful: Moen Consumer Support

  • weedmeister
    13 years ago

    It looks like a cover for a valve model used for a bathtub with shower. What model valve are you using?

  • MongoCT
    13 years ago

    Some of the plastic inserts become part of the permanent installation, others are temporary, almost layout and installation aids.

    You'll sometimes hear them referred to as "mud rings" or "plaster rings", somewhat of a nomenclatural leftover from when a plate was set over the valve prior to the wall being mudded or plastered, it protected the valve body from getting damaged during the process.

    The valve does need to be set at the proper depth, that makes sure that the trim kit will fit properly and the valve can be properly operated within the wall. Sure you can use a tape measure to set the depth, but if the plumber installs the valve at the "standard" depth but the finished wall construction/detailing is non-standard, the tiler can see what he has to work with depth-wise prior to building out and finishing the walls. It's quite apparent if the big honking plastic plate that says "install flush with finished wall" is to proud of the tile or buried too deeply within the wall.

    Yes. it's a large hole. But as others have mentioned, the gasketed escutcheon will cover the hole. The size of the hole is optimized for trim kit installation as well as future maintenance. The goal is to maximize access versus having to cut away tile to get at problematic plumbing.

    With the escutcheon being gasketed, water infiltration will not be a problem.

    Mongo

  • stash-hdy
    13 years ago

    The hole needs to be large enough to accommodate the screws for the trim plate. Moen also has a collar that slips over the rough in; the hole has to be large enough for that. From what I can see you the hole is too small for both conditions. The white plastic is a spacer to ensure that the rough in is at the correct depth after the tile is installed. Do a dry run on installing the trim pieces to ensure you have clearance before the tile is installed. The directions also detail what I have stated.

  • homebound
    13 years ago

    What's the model# of this thing? I would like to read up on it firsthand. Thanks.

  • stash-hdy
    13 years ago

    http://www.moen.com/shared/pdf/instruction_sheets/ins917e.pdf

    Here is a link to Moen, Moen valves are basically the same for all their models.

  • mowers
    Original Author
    13 years ago

    I measured when installed to get the correct depth when sweating the pipes. Everything I need to install the trim is exposed. And I can remove the guts to replace the mechanism. So making a larger hole still makes no sense to me. I will find out the model number. I just think it is silly to blow out a large hole just to install a plastic piece so you can guage where the tile should be flush to.

  • stash-hdy
    13 years ago

    If you can install the trim, collar and the trim is at the correct depth no need for a larger hole. Some manufacturer�s valves have a built in shutoff so access may by needed for access. No need to enlarge hole is the conditions noted above are OK.

  • brickeyee
    13 years ago

    The holes in the plastic for the trim mounting screws show that your existing hole size is inadequate.

    The bottom left screw hole needs to be clear if cement board so the trim screw can reach the valve body.

  • weedmeister
    13 years ago

    The model number should have been on the box the valve came in. I've linked to the sheet for the valve I have. This valve assembly has 3 other 'items' to the left and right of the control stem that may need adjusting or maintenance in the future. Hence the bigger hole.

    It is also conceivable that in some tub installations the tub spout would come out the bottom, hence that cutout.

    In any event, the plastic piece is discarded before the cover plate escutcheon is installed. On mine, the gasket materiel is at the outer perimeter of that plastic piece, implying that the tile would need to come inside that line a bit.

    Here is a link that might be useful: sheet

  • stash-hdy
    13 years ago

    It looks like weedmeister has the right valve based on the plastic spacer shape. There is a need for a larger hole to access the integral stops and the balancing valve.

  • pete_p_ny
    13 years ago

    I would guess your valve does not have shut offs, so blowing out a hole that large makes no sense. Why have a 5" diameter hole??? You would have a balancing stool, so blow out another inch to the right to expose the slotted piece so it can be removed. As long as you can get the pin and cartridge out, you are good to go. The cartridge is your maintenance issue going forward, if any. If the hole is closed up too much, sometimes you cannot lift the pin out, so make sure the room above the cartridge is adequate. If your valve does have shut offs, just enlarge the hole to expose, but no more. Just make an oval or rectangle to emcompass the parts you need access to. Again, most valves are sold without the shut offs from home centers.

  • stash-hdy
    13 years ago

    The message from all is to make sure mowers has enough room to access what ever is required and the depth is correct. Mowers do you have access and the correct depth so this question and answer can be ended?