Shop Products
Houzz Logo Print
cmc_in_sf

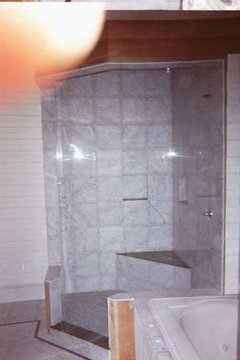
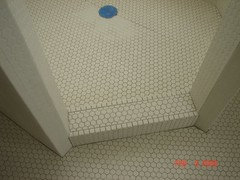
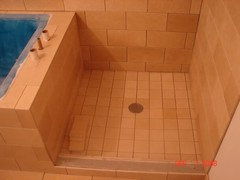
I'm desparate for shower construction help, please!

cmc_in_sf
15 years ago

Oh where do I start? So I've posted here before with questions about Kerdi and there were questions on whether I could use the Kerdi drain or not (due to some SF code that doesn't allow the PVC nor ABS in the plumbing system. Someone from SF did reply that the code may have changed, but unfortunately I didn't have the time nor the resources to find out. So, in the meantime, the contractors already poured the concrete shower pan and slapped some cement board around the shower, but only 6 1/2 feet up. The rest of the walls in greenboard and the ceiling in regular drywall. (note this is a walk in shower). My husband noticed that they used regular drywall screws in the entire shower. I also noticed that they put roofing paper on top of the studs before putting up the cement board and green board and have a sinking feeling that they did not put any other moisture barrier (poly-vinyl?). So, I'm pretty sure we will need to replace the greenboard and drywall (note: we want to put porcelain tile up and on the ceiling)and at that point we will determine if they put any moisture barrier. I also put my foot down on this crew and want to do the work ourselves. Mind you that neither my husband nor I have any experience in bathroom construction. I do have a couple of friends who are willing to help with the tile installation, but they are weekend DIYers. So, I guess my question is:

If we can't go with Kerdi (which I believe is too late any way since the drain is in and the shower pan is installed). Should we go with Reguarding? If so, where should I get info on how to apply? If no, any other suggestions?

I also have a few tile laying questions, but I'll create another post for that...

Thanks!

-Chris

Comments (57)

  • weedyacres
    15 years ago

    But why not Redguard when there's tar paper behind the wall?

  • bill_vincent
    15 years ago

    So, what do you think of my question about cutting tiles in half to create a pattern with full tiles?

    That could be done. If you're talking about doing a row of full, then a row of halves, or if your talking about alternating a full tile, and then a half, and then a full, etc., there's no need to shave anything off the half tiles. If, however, you want to do a full tile, then two halves together, taking up the SPACE of a full tile, then you'd have to cut off a grout joint off one or the other half. But no matter which way you're talking, it CAN be done.

    But why not Redguard when there's tar paper behind the wall?

    Because you then create what's called a "moisture sandwich", where moisture can get trapped and create a perfect breeding ground for mold and mildew.

  • bill_vincent
    15 years ago

    Good question. I usually use other products, so I don't know. Best bet would be to head down to HD and check it out.

  • MongoCT
    15 years ago

    I'll toss in one other thing:

    If there is framing, then lapped tar paper, then cement board, when the cement board is cut away to create space for the niche, the integrity of the tar paper will be destroyed in the process of gaining access to the stud cavity.

    So with the tar paper now gone behind the niche, you'll want to use a topical membrane like RedGard in and around the niche.

    Mongo

  • cmc_in_sf
    Original Author
    15 years ago

    Thanks, Bill and Mongo. I will definitely use a topical membrane in and around the niche. Any other membrane recommendations beside Redgard encase they don't have or only sell big quantities?

  • bill_vincent
    15 years ago

    Laticrete 9235 (sometimes comes packaged as a product called "Blue 92") Or Laticrete Hydroban.

  • cmc_in_sf
    Original Author
    15 years ago

    Thanks, Bill!

  • cmc_in_sf
    Original Author
    15 years ago

    Bill, I thought I'd bring my shower pan predicament to this thread so I don't have to go back and forth between them. So, to recap. I found from the other thread that it is very important to create a concrete pre-slope before laying down the shower pan liner. The contractors did not do this.(I wish the plumbing inspector would have suggested this pre-concrete pre-slope). DH is too busy with other construction work in our house and we don't have the money to have the contractors re-do and beside, I'll probably get push back from them that everything is fine the way it is. So, if this pan is going to be redone, it may be me who does it. So, obviously the concrete will need to be demo'd, the cement board from the bottom to at least 2 feet up the wall need to be remove, I imagine? Replace the tar paper behind it since that will probably be ripped up, the liner will probably be completely replace since it will most likely be compromised as well. Anything else? So, any tips on creating the preslope. Where can I get step-by-step instructions on creating the entire shower pan? O gawd, I'm not sure if I can do this. My time frame to get things all prepped for tiling is end of June.

    Thanks, as always!

  • bill_vincent
    15 years ago

    Step by step instructions are at the following link:

    Here is a link that might be useful: Harry Dunbar's Ontario Tile

  • cmc_in_sf
    Original Author
    15 years ago

    Oh Thank you again, Bill! I'll look it over. Maybe I can do it.

  • cmc_in_sf
    Original Author
    15 years ago

    Ok, I'm back to this thread. I just finished tiling the shower ceiling and will be grouting it next. Next I will be tiling the shower floor with 2x2 porcelain mosaics. I think that seems pretty straight forward (I hope!). After that, I plan on laying out lines for the tiles for the wall. So, here's my question about actually tiling the walls: do you typically lay the tiles row by row all the way around the shower or do you do lay the tiles row by row one wall at a time? Seems like a silly question as I type this, but seriously, I have no idea which is better way. As always, TIA!

  • bill_vincent
    15 years ago

    I'll usually take one wall at a time. let me ask you how big are the tiles you're using? Also, have you checked the coursing from top to bottom? (one course = 1 tile and 1 grout joint)

  • kjf2409
    15 years ago

    I have a follow-up similar question: we're having a new alcove shower installed with a cast iron pan. The contractor hung black roofing paper over the studs before hanging the Durock. The Durock comes down and butts up against the cast iron flange. The contractor did not think to pull the roofing paper forward so it overlapped the flange. If it is too late to remove the Durock and pull the paper forward, should I add some further waterproofing (Redgard, a sheet membrane,...) to the walls?

    And since the Durock also does not overlap the cast iron flange, but just sits above it - what is the best way to seal that joint?

    We had planned to use 1" mosaic tiles, but now I'm wondering if we need to use a bigger tile with the Durock/cast iron flange configuration. Any ideas?

  • bill_vincent
    15 years ago

    If the Durock was put in with screws, it can be removed relatively easily. As for the joint under the Durock, that can be filled with stiff thinset to back the bottom tile.

  • tileman1
    15 years ago

    HD sells one gallon buckets of Redgard.

  • cmc_in_sf
    Original Author
    15 years ago

    The pattern is made up of a row of 6x13 as a base and main pattern is alternating 13x13s and 2 stacks of 6x6s, then at the 6 foot level, I'll have a pattern that is 2" high and above that and 2 rows of vertical 1/2 tiles of the 13x13s. I don't think it's as busy as it sounds. How do I embed a pdf of this design in a post? It would be much clear with a visual :). Thanks!

  • cmc_in_sf
    Original Author
    15 years ago

    Bill- can you please direct me to a site or a good detailed book that gives basic step-by-step instructions on how to start laying out tiles in a shower? One book I have suggest setting a horizontal line at the lowest point of where the first full tile would be set and nail a ledger for it to sit on. Set that row of tiles, then set the tiles that go below it(which would be the 6" base tiles I mentioned in my design description). Does that sound right? And also, what would be the advantages of doing one wall at a time vs. going around the four walls as you go up? Thanks!

  • bill_vincent
    15 years ago

    One book I have suggest setting a horizontal line at the lowest point of where the first full tile would be set and nail a ledger for it to sit on. Set that row of tiles, then set the tiles that go below it(which would be the 6" base tiles I mentioned in my design description). Does that sound right?

    Exactamundo. :-) Figure out your layout, and get a level line drawn where the bottom of the first full row will sit. Nail your ledger boards there. This is why I asked above what the tile size was that you were using. I apologise that I missed when you posted it. In your case, you might want to go above the first 13x13 row. It'll be pretty tough to get a ledger board in level down 6" off the floor.

    And also, what would be the advantages of doing one wall at a time vs. going around the four walls as you go up?

    There's not much room in the shower to work, and once you're set op for a wall, you might as well finish it before you shift around and start another. It's a time saver, more than anything else. If you feel more comfortable bringing all the walls up at the same time, then have at it! :-)

  • cmc_in_sf
    Original Author
    15 years ago

    Bill, thank you so much for all this helpful information. I just realized we need to do a lot of prep work before diving into the tiling. I'll report back once I get start or when I have more questions :). Again, thanks!

  • cmc_in_sf
    Original Author
    15 years ago

    Okay, I'm back with another question. This one is about the shower niche construction. I uncovered niche framing that was covered up, so I need to cover the inside with cement board before Redgarding. So here's a question from a newbie, how does one attach the cement board to the backside when there's gyp. bd. from the other side of the wall there? Glue it? Or is there a way to screw it into the framing? (One of these days we'll get this bathroom finished)TIA as always!

  • bill_vincent
    15 years ago

    Actually, I DON'T attach cement board to the back of the sheetrock. I do the cement board around the 4 sides of the return, and then waterproof the whole thing, as is. Once waterproofed, the sheetrock is just as good as the rest of it.

  • cmc_in_sf
    Original Author
    15 years ago

    Ah, ok. That will make a little easier for me too. Thanks, Bill!

    -C

  • cmc_in_sf
    Original Author
    15 years ago

    Okay, the niche is ready for the Redgard now. According to the instruction, it says to apply it with a textured roller or a v-notch trowel. Is that an absolute or can we just use a paint brush? TIA!

    -Chris

  • bill_vincent
    15 years ago

    I guess you COULD use a brush. I think the only thing that would suffer would be the uniformity of the application. It would certainly help getting into the corners, though.

  • egon
    15 years ago

    Hello,

    I'm a novice in the middle of a bathroom reno, trying to figure out how to create shower niches on a wall that is framed with metal 2x3 framing. If you don't put cement board on the back of the niche, doesn't that leave it vulnerable to someone hanging a picture on the other side of the wall and breaking the water proofing and or tiling? (I've found picture hanger nails protrude about 1/4" through the back of the drywall.)

    Also, what is the recommended pitch for marble shelves in a shower niche?

    "Actually, I DON'T attach cement board to the back of the sheetrock. I do the cement board around the 4 sides of the return, and then waterproof the whole thing, as is. Once waterproofed, the sheetrock is just as good as the rest of it."

  • bill_vincent
    15 years ago

    If you don't put cement board on the back of the niche, doesn't that leave it vulnerable to someone hanging a picture on the other side of the wall and breaking the water proofing and or tiling?

    Even if you DO use cement board, it's STILL possible. I've actually had that happen once. In the following picture, there are two niches-- the one you see straight ahead, and another one just like it on the right. In the one on the right, the backside of the wall is a closet, and the contractor hung a closet organizer system, putting a screw through the sheetrock, through the waterproofing, and had a hard time getting through the marble, so the moron used a drill to get the screw the rest of the way through, not realising why the screw was having such a hard time! DUHHHHH!!

    You need to be cognisant of the fact that you can't put screws through that area. That's all there is to it.

  • egon
    15 years ago

    I know the wife wants to hang something on this wall - should I try to use a cement board back or can I just frame the back of the box with plywood since we will Kerdi all the shower walls anyways?

    Also, what is the recommended pitch for marble shelves in the shower niche?

  • bill_vincent
    15 years ago

    If you're going to put anything there, use the cement board.

    As for the shelf, pitch it about 1/8"

  • cmc_in_sf
    Original Author
    15 years ago

    Bill - I have a question about tiling the shower floor. I mentioned in the original post that someone else poured the shower pan and I had not looked at it too closely until now since I plan on starting the tiling in the next week or so, but the drain is only sticking up 3/16" from the concrete. The tiles I will be using are 3/16" thick. With the thinset, the tiles will be higher than the drain. I'm thinking this can't be right. Any advice on how to fix this? Thanks as always.

    -Chris

  • bill_vincent
    15 years ago

    Is your drain round or square?

  • cmc_in_sf
    Original Author
    15 years ago

    Bill, it's round.

  • bill_vincent
    15 years ago

    What you might try is taking the grate off of the drain, and see if you can take a hammer and something blunt, and twist the drain aound enough to bring it up an extra 1/16".

  • cmc_in_sf
    Original Author
    15 years ago

    So, the drain is probably screwed into the pipe? Will 1/16" be enough? If the tile thickness is the same as the height of the drain plate above the concrete right now, and try to raise it 1/16", when I spread the thinset and place the tile on it, would the drain be high enough? Should I try to spread less thinset around the drain? Ideally, where should the drain plate be in relationship to the tile. I imagine it's to butt up even to it? Also, what's the best way to cut the tiles around the drain. We're using 2x2 porcelain mosaic. TIA again.

    -Chris

  • bill_vincent
    15 years ago

    Even with 1/16" extra, that's more than enough for 2x2's. Ideally speaking, with the tile sitting dry, the drain should be about the thickness of a credit card higher than the tile, so that once the thinset is added, the two will be flush.

  • cmc_in_sf
    Original Author
    15 years ago

    What size notch trowel should I use to spread the thinset? So, the thinset will be a thin coat (as thin as acredit card)? Actually, do you have a general guideline for trowel sizes. I haven't checked your FAQ page lately, has this question been asked before?

    Also, can you please give me some tips on cutting and laying the 2 x2 tile around the drain? Any pictures would be most helpful. Gee, with all my questions, I feel I should give you my first born now :). Again, thanks for your time. I promise to reward you with at least some pictures once this is all done.

    -Chris

  • bill_vincent
    15 years ago

    WAIT A SECOND!! I've HAD and RAISED my kids!! Now I give the kids back to their parents when they start crying or it's time to change em!! (It's great being a grandparent!) You be my guest and hang on to your first born!! :-) As for the trowel, and 3/16x 1/4" v-notch is all you need. When you lay the tile into the thinset, it'll compress to 1/16", MAX. As for cutting in the drain, there's an easy way to make yourself a template-- apply so tape to the top of the drain, and then use a utility knife to cut off the extra flush to the edge of the drain. Then simply peel it off the top of the drain, and put some dust on the back of it so it's not sticky any more. You now have your template. Now, lay your sheets in dry, OVER the drain. you might want to get a flashlight for this. I usually carry a small LED pocket light just for this reason. Shine it through the grout joints, so you can see the drain's edge, and make your marks on the tile. Then lay your template inside the marks, and mark out your drain, making sure to stay equidistant from the edge of the template (so you end up with a nice uniform joint). once you've made your marks, you might want to cut the tiles from the sheet, but making sure the pieces to be cut will be backed up with atleast one full tile all the way around (it'll help hold all the tiles together after being cut). Now it's time to cut your pieces. Best bet for someone with no experience would be a wet saw. Cut what you can, and then grind the rest off using the side of the blade.

  • cmc_in_sf
    Original Author
    15 years ago

    Heehee. Okay Bill, you don't have to take my kid. He's kinda attached to me right now anyway (he just got over me leaving him in preschool for 3 1/2 hours a day).

    So, you recommend a v-notched trowel, not a square notched? Also, encase I can't twist the drain up is there a plan B?

    You make the cutting of those tiles sound so easy. I'm kind of doubtful that mine are going to look anywhere as nice (or straight) as your professional work, but I will try. Thanks again for all the tips.

    -Chris

  • bill_vincent
    15 years ago

    That's exactly how I do all mine, only I keep an extra drain with me the same size as most of the drains I cut in, and I use that, instead, as a template. Other than that. the way I described is how I do my drains.

  • cmc_in_sf
    Original Author
    15 years ago

    Thanks for the pictures, Bill. Very nice!

    Do you have any other suggestions if I can't get the drain up 1/16"? I haven't tried yet, because one of the screws is stripped.

    What is the difference in outcomes with the v-notch vs. square notched trowel. Sorry to keep asking these questions, but I was thinking I might start laying down the tile this weekend.

    Thanks, as always!

    -Chris

  • bill_vincent
    15 years ago

    If you can't raise the drain any higher, you're only talking a 1/16". You can leave the joint around the drain a little wider, and just slope the grout down. As for the difference between using a square notch and v notch, it depends on the size. The usual culprit is a 1/4x 1/4 square notch and it will leave alot more thinset on the floor than the v-notch that I specified. What then happens is the thinset will purge up thru the grout joints, and you end up with a mess, and actually pregrouting the tile with the thinset. Not a good thing.

  • cmc_in_sf
    Original Author
    15 years ago

    That's great info, Bill. I will definitely take your advice. Wish me luck. I'll report back later...

    -Chris

  • cmc_in_sf
    Original Author
    15 years ago

    Okay, so I haven't started this weekend as planned yet.

    Bill, I have few questions before I start. Here goes:

    Which would you do first - the floor or the walls?

    What would be a good way to transition from the entirely tiled shower to gyp. board walls out side of the shower. I'm thinking I don't want any door trim (it's a doorless shower). Can you just use bullnose pieces to terminate at the gyp wall? or would that look funny?

    I think I had another question, but it eludes me right now...

    TIA!

    -Chris

  • cmc_in_sf
    Original Author
    15 years ago

    Oh, now I remember. Do I need to do anything to prep the concrete shower pan before laying down the tiles?

    TIA,

    -Chris

  • bill_vincent
    15 years ago

    Can you just use bullnose pieces to terminate at the gyp wall? or would that look funny?

    That's how it's usually done.

    Do I need to do anything to prep the concrete shower pan before laying down the tiles?

    You might make sure you have a nice flat pitch to the drain with no divots that'll hold water afterward. Other than that, you should be good to go.

  • cmc_in_sf
    Original Author
    15 years ago

    Bill, thanks for answering my questions. How about which comes first, the walls or the floors?

    Thanks again!

    -C

  • bill_vincent
    15 years ago

    That's up to you, but personally, I prefer to do the walls first, leaving out the bottom course, and starting off ledger boards, then the floor, and then the bottom course, so that the wall covers the floor cuts.

  • cmc_in_sf
    Original Author
    15 years ago

    I think that sounds like a good idea to me. Thanks again, Bill.

    -Chris

  • cmc_in_sf
    Original Author
    15 years ago

    I think that sounds like a good idea to me. Thanks again, Bill.

    -Chris

  • bill_vincent
    15 years ago

    You're welcome? :-)