


Curbless shower questions and decisions
I'm looking to replace my existing shower over a wooden subfloor with a curbless shower.
Some items I'm considering are
Using Large format tile (13" x 40") for the wall, 1/16 grout lines
1. trench drain - QuickDrain?
2. DITRA for the bathroom subfloor + Kerdi over foam slope boards, something like what Quickdrainusa is offering.
OR
Vapor barrier + chicken wire floated and sloped floor + Kerdi just below the thinset + tile.
OR
A trench drain custom pan
4. Epoxy grout
OR
Normal unsanded grout + groutboost
6. Glass tile (IMAX steel) or
Porcelain tile that looks glass like.
Would there be any issues trying to adhere Kerdi to plywood using thinset?
What preparation should be done for the subfloor besides lowering it for the shower area?
Thanks,
David
Comments (57)

David
Original Author14 years agolast modified: 9 years agoWould it be possible to slope in either direction 1 or 2 (direction of slope 1/2)?
Putting the trench drain in location 1 could be beneficial in reducing the length of PVC drain.
The size of the vanity would probably be reduced.
Comments?

johnfrwhipple
14 years agolast modified: 9 years agoDo you want the channel drain to line up perfect with the finished tile?
What about the channel drain at the entry?
Which way do the floor joists run? Is it slab on grade construction?
Is the glass panel going to be fixed into the tile or a U Channel?
Did you consider a wall hung toilet?
What about the use of glass blocks?
Who is doing the install? Is there going to be steam? Can you work below?
Question, question, questions....
Related Professionals
Arlington Kitchen & Bathroom Designers · Commerce City Kitchen & Bathroom Designers · Terryville Kitchen & Bathroom Designers · Town 'n' Country Kitchen & Bathroom Designers · Gardner Kitchen & Bathroom Remodelers · Ogden Kitchen & Bathroom Remodelers · Pasadena Kitchen & Bathroom Remodelers · Santa Fe Kitchen & Bathroom Remodelers · Carol City Glass & Shower Door Dealers · Del Aire Glass & Shower Door Dealers · Fort Myers Glass & Shower Door Dealers · Key Biscayne Cabinets & Cabinetry · Mount Prospect Cabinets & Cabinetry · Stoughton Cabinets & Cabinetry · Orange County Window TreatmentsMongoCT
14 years agolast modified: 9 years agoDavid, since the wall on the right seems to be the wet wall with all the plumbing, putting the drain at location "1" would be a fine idea. Especially, with that being the wet wall if your shower head will be on that wall too. That way when you're facing the shower head wall your toes will be facing downslope instead of you having to stand on a side slope.
But as you can tell there are variations, you can switch the slope or shower head location. In general though, with a trench drain floor that has a single-direction slope, it's less comfortable to stand on a side slope with one foot lower than another. The steeper the slope is, the more uncomfortable it can be. Not a deal breaker, but something to think about.
You asked about building a small curb if required. No, it's not difficult at all. I've added to the "curb height" by creating a gentle hump in the floor at the shower entry, I've done that for roll-over entries. Or you can start the floor sloping downward outside the shower door, in the bathroom area itself. There are several ways to skin that one.
If your entire room is a wetroom, then I'll most often use Kerdi in the shower and Ditra on the bathroom floor. The Ditra seams are not waterproof, so they need strips of Kerdi over the seams. The floor/wall intersection isn't waterproof, so I'll run Kerdi from the ditra on the floor up the wall a few inches. If you have a conventional floor toilet the flange area needs to be sealed. Usually Kerdi there too, but that can be tricky. In new construction or if it's a gut-job remodel, a wall toilet can be installed.
Obviously any other floor penetrations need to be detailed too.
Some of the other questions you directed to me:
1) In general I prefer to use deck mud for shower floors instead of foam trays or foam slopes. I know what I'm getting with deck mud, which is whatever I want. I can shape it, shave it, size it, I can make it do what I need. I can change the slope as I go along the floor. If the plans change, deck mud can conform to those changes. I've used Kerdi Trays before in a commercial building I bought and converted to apartments. But in general I prefer deck mud. Virtually all the work I do is one-off design, so deck mud works best for me. Opinion there, you can use whichever you feel more comfortable with.
The absorbency of the tile matters more in a steam shower, not so much for wall tile in a Kerdi shower. The tile is glazed, the glaze is waterproof for the most part. Grout can pass water, but with the Kerdi being right behind the tile there's no deep wetting into the wall.
Careful with the floor tile, make sure it's actually rated as "floor tile". Some of those high-absorbency tiles are usually just rated for walls.
2) Yes, for a wet room you'd Ditra the floors and Kerdi the Ditra seams. Then in the shower you'd put Kerdi right on top of the deck mud slope, or foam slope, if it's compatible and that's what you choose to use. And yes, outside the shower to make a wet room you'd cut a strip of Kerdi and run it off the Ditra and up the walls. Kerdi can be thinsetted to drywall with no problems.
3) Schluter profiles. Nope I never use them in showers. They usually just don't fit the look that I'm designing for. Total opinion there. Certainly use them if they fit your plan. I'll either grout of caulk the corners or changes-in-plane, it depends on the method of construction. For DIY and most pros, with lightweight construction (cement board over wood framed walls) then caulk should be used.
Oh, and while not discussed, in a wet room a floating (no pun intended) vanity can work well, especially in a modern or contemporary design.
Best, Mongo
johnfrwhipple
14 years agolast modified: 9 years agoLocating the shower controls can be a challenge here with your lay out. I made the assumption that the floor joists run from the shower towards the exterior wall for the sake of sketching. It might well be that they run the opposite direction.
Can you inspect from below? Do the plumbing water lines and waste lines enter through the floor or wall inside the vanity? This floor needs to me made water tight and extra care needed at the toilets connection.
Is there an access issues for the other tub? Something in the vanity?
How is the room heated? Do any vents enter through the floor?
David
Original Author14 years agolast modified: 9 years agoMongo,
Yes, direction 1 makes more sense.Would you use chicken wire over the entire floor just so that it becomes one piece? Does the idea make sense?
How much additional bracing would be recommended for the walls that will be tiled? Is there any method to employ to reduce the shock from doors being closed/ sliding shut?
The reason I ask is because although my current shower (constructed over chicken wire floated walls) seems fine, cracks developed in tiled wall grout over the tub in the adjoining bathroom around the areas where the glass shower door slides against. The door tends to close with a small thump which is transmitted through the wall.
Thanks,
David
David
Original Author14 years agolast modified: 9 years agoJohn,
Wall hung toilet? hmm... need to do more research on that - which one, how to install, how to fix.
Glass blocks? maybe, I'd have to see how much space I can spare.
Yes, the joists run the direction you mentioned.
I have full access to the crawl space and been there quite often inspecting for potential issues.
No heating, no floor vents. Winter's relatively mild.
Would radiant floor heating for a small bathroom make sense?
Would you make an entire floor as 1 single piece - chicken wire?
How different is the ACO channel drain from the Quickdrain? Which would you recommend? How was the water proofing like?
Thanks,
David
MongoCT
14 years agolast modified: 9 years ago"Would you use chicken wire over the entire floor just so that it becomes one piece? Does the idea make sense?" If you're dropping the floor framing in the shower area, then you don't have to build up the floors in the bathroom with mud. But if you do want to mud the entire floor, then I'll use a slip sheet (tar paper or poly, poly if it's RFH) covered with expanded diamond lath, then mud. And yes, you can do the entire floor at once, the diamond lath can run from in the shower out onto the bathroom floor. Chicken or poultry wire is common on walls, diamond mesh on floor. At least where I am. There are most certainly regional variations. Floors are done with deck mud; portland cement and sand. Walls are done with hot mud, with lime added to the mix.
How much additional bracing would be recommended for the walls that will be tiled? Is there any method to employ to reduce the shock from doors being closed/ sliding shut? Nothing is normally needed, but if your walls are a little sketchy than you could skin them with plywood. Just take into consideration the added thickness of the plywood when you rough in your valves, etc.
The reason I ask is because although my current shower (constructed over chicken wire floated walls) seems fine, cracks developed in tiled wall grout over the tub in the adjoining bathroom around the areas where the glass shower door slides against. The door tends to close with a small thump which is transmitted through the wall.
Yup, a mud wall will last forever. If the grout on your lightweight wall is cracking in the field, that's bad. If it's cracking in the corners, that's expected.Some sliders have rubber or silicone bumpers within the vertical track to cushion the door when it's opened or closed. You could try to add some small clear silicone "cabinet door bumpers", they look like small half-spheres, maybe 1/4" to 3/8" in diameter with self-stick adhesive on the flat side.
David
Original Author14 years agolast modified: 9 years agoMongo,
It's cracked in the corners and then some.
There are cracks on the floor grout lines in both bathrooms. Probably something to do with a floor that is not sufficiently stiff. In other parts of my home, I've added plywood to the subfloor/ replaced sections for better rigidity.
Would epoxy grout help in anyway control cracking or would latex additive be better?
David
MongoCT
14 years agolast modified: 9 years agoI don't use epoxy enough to give you an informed answer for how it would perform on a flexing wall. But I have heard of a case where the epoxy grout was so strong that the tile cracked instead of the epoxy grout. I don't recall the specific source of that story, but I though that analysis came down to the fact the the epoxy was stronger than the tile. The tile became the weakest link.
That does bring up a point though, in your first post didn't you mention you were going to use large format tiles? Something like 12" by 36"?
The larger the tile you use, the flatter and more rigid the surface that it's going on has to be. Plus, wall tiles are generally not a strong as floor tiles, so you have large AND weak tiles. You need a real stiff wall.
davidro1
14 years agolast modified: 9 years agoDavidtay, it would be good to describe the structure. Studs, joists, etc.
If you have large hard (PEI 5) porcelain and epoxy, on a good wall, you will have a strong wall. Since it's only as big as a shower, i think you can get it straight.
Radiant floor heat is good, but do you have an insulation layer in your plans?
David
Original Author14 years agolast modified: 9 years agodavidro1,
I've got fiberglass batts below. My main concerns with radiant floor heating are
1. Whether it would make sense in a relatively small space and in a relatively moderate climate zone (Northern CA).
2. Cost effectiveness since the bathroom is not normally occupied.davidro1
14 years agolast modified: 9 years agoIf it costs next to nothing, and if you have the time and skill, what will prevent you from doing it? Warm tiles add to comfort,, significantly. Heating tiles reduces your heating costs from the other heat sources, so it evens out and doesn't cost you more unless you are making the space significantly warmer. It's a quality thing, and a sensory thing. Cost is not the concern, if your heated area is as well insulated / airtight as any other heated portion of your house.
David
Original Author14 years agolast modified: 9 years agoI will need to figure out the circuitry for the bathroom since a dedicated 15A - 20A GFCI circuit is usually required for radiant heating. Might be running out of circuits.
David
Original Author14 years agolast modified: 9 years agoMongo,
Yes, I'm definitely considering 13" x 40" (really 39 7/8") from Porcelanosa as those I used in my kitchen were really much better than what was there before.
The wall between the bathrooms seems rather weak, especially since it's not load bearing.
As the baths are remodeled one by one I'm concerned that demolition in the other bathroom would adversely affect the other, the bathrooms being back to back.
Ultimately, I would probably end up doubling up some studs and perhaps a shear wall. Would having an additional layer of 1/2" plywood be problematic for making the wall really flat using the chicken wire + Kerdi on top?
I'm considering using the same tiling contractor as I still haven't warmed up to the idea of setting large tile or floating a wall/ floor by myself.
I guess tiling is the final frontier for me.
davidro1
14 years agolast modified: 9 years agoI wouldn't worry about the wall. I'd think more about the foundation, the floor, the building. For straightness, metal studs are great. 2" studs are great. If you double them in one single area, you have a really strong tube. For flatness, get Wedi.
David
Original Author14 years agolast modified: 9 years agoThe foundation is fine.
The subfloor is not great in some areas - planks laid in a diagonal with some gaps in between.
I'm more inclined to add plywood since that would make the wall more shear resistant.
The additional reinforcement and type used would then influence other decisions.
johnfrwhipple
14 years agolast modified: 9 years agoPictures of your project would help so much.
You have mentioned increasing your wall's shear strength. Below this wall is there another wall? Is that wall tied into foundation?
A shear wall can be as simple as 1/2" ply nailed to your 2"x4" wall but this wall needs to be tied into the wall below and that tied into the concrete footing to really work well. All seams need solid blocking so addition blocking needs to be placed at 4'. Pay attention not to over drive these nails with an automatic nailer and check with your local building inspector about nailing spacing. Something like 3-4" centers should be spec'd.
You asked how you install the channel drain against the wall so it lines up with the drain. We installed ours yesterday just this way and it looks great.
The quick drain USA channel drain we used comes attached to some Noble Sealant (a Blue version of Kerdi - kind of) and we skipped the cbu on the bottom 5" of the side walls and back wall and installed solid blocking (2"x6") between the wall studs. The drain was set into a quick setting mortar bed and the noble sealant was folded and pinned in the corners.
I drove 6 wafer head screws to pin the folds tight and keep these screws 3" above grade ( 1/2") above my curb height. Before screwing the noble sealant I used quick setting mortar and my Kerdi Trowel to cover all our solid blocking. For good measure I tied in some Kerdi Band over top.
While Riccardo worked below and attached the new 2" cast iron p trap I held a framing square against the wall and we packed the through hole in the concrete with some Hilti Bricks (fire stop bricks we cut and pack holes with) and adjusted the drain to be level in both directions.
With a couple of wall tiles we adjusted the drain to give my setter some room for setting material and a 1/16" grout joint off the back wall and side walls. We worked out these measurements prior to pouring our concrete curb.
The drain went in like butter and the whole process took about 15 minutes. We had all the pipe connections in the suite below prepared a couple weeks ago so it was really easy. The quick setting mortar I use is made by Mapei and is called Grani Rapid.
Again I can't find my camera cable - it's in the shop. I'll post some pictures later today if a get a chance.
As a disclaimer I am installing this drain with my own methods. I have chosen to build this shower like I build all my projects - bullet proof. My methods like much of what I do often are off the beaten track so please don't follow my instructions and inspect all other to agree with my techniques. Please check with Quick Drain USA, Schulter, your local inspectors and run by my methods if you chose to copy my install.
I have been working with mud, mortar, bricks and blocks for over 20 years and with every job there comes a grey area that expierence and practice can help me get through tough set ups and difficult installs. These new space aged mortars are very expensive and incredible good. We typically use about $150 - $250 in premium setting materials per shower project.
Good Luck.
johnfrwhipple
14 years agolast modified: 9 years agoA look at yesterday's install.
We installed this drain in about 15 minutes flat!
All the prep work was complete a couple weeks back so we only set the drain and tied it into a new 2" solid cast waste line and a solid 2" cast p trap. This shower is in a condo so we used Hilti Bricks for fire stopping and this product braced the drain level and square while the quick setting mortar set up.{{gwi:1422747}}
MongoCT
14 years agolast modified: 9 years agoJohn,
Ditra in the shower? Are you covering that with something else or are you going to tile on the Ditra?
How did you seal the Kerdi to the Nobel?
David
Original Author14 years agolast modified: 9 years agoInteresting, this is the first time I've seen DITRA as part of the shower pan install mentioned online. Maybe a workable solution based on information from various online sources.
Was the drain bonded to the nobel membrane? Was the Kerdi bonded to the Nobel using thinset?
How do you test to ensure that the drain & pan is water tight?
Thanks,
David
johnfrwhipple
14 years agolast modified: 9 years agoThe Ditra in the shower is covered by Kerdi. I set the Nobel Seal to the Ditra with Grani Rapid and then covered the entire shower floor in Kerdi. The Ditra was prefilled where the nobel fabric would sit. Quick Drain USA's instructions recommend modified thinset and a couple beads of Nobel Sealant Chaulking.
It was a huge pain cleaning the channel drain after the kerdi instal. I should have cut some rigid foam to seal the drain tight.
To insure that things are watertight we will flood test this shower pan on Monday. It was really tight installing the new 2" line (from the suite below) and I could not install a clean out for my test plug. I will have to find a way to plug the drain. The test plug may fit in the drains opening.
Again for the record my instal above is of my own design and is not recommended I think by any one. I have grown to love Grani Rapid for it's strength, set time, colour and it's lack of Efflorescence. My hands and fingers are covered in the stuff and it usually takes 2-3 days to get it all off. This is an expensive way to prepare a shower and many prefer to use the styrofoam method. I won't convert - I choose concrete and over kill.
Please follow your local instal codes and check with your local inspectors before trying anything I did here. I own these installs and set these shower floors myself - every job. I test my work with flood tests, flow tests and inspect with my inspection camera. I look from above and below before we set tile and will protect this shower floor from damage with Ram Board and drywall off cuts.
I have not passed every flood test I have done over the past 7 years I have had a number of leaks on a number of jobs - this is the point of the flood test. Are supply lines failed a pressure test last week and we had to replace 2 defective brass connectors. My own home failed a flood test because of a hole in a vent line pipe (what you get for using old off cuts) and because of one non glued fitting. Flood and pressure tests are no brainers and any one skipping these steps is taking a huge risk.
Here is a link that might be useful: Grani Rapid
MongoCT
14 years agolast modified: 9 years agoJohn, the following is not an attempt to pick on you. I don't do that.
Don't confuse "spending more money" with "better construction". Materials can be used in the "proper" or intended way, or they can be used in unconventional ways or for unintended purposes...but regardless of how a material is used, it still needs to be properly detailed.
You need two beads of NobelSealant sealant to seal the blue NobelSeal membrane any other membrane. That's not my opinion. That's according to the tech departments at Schluter and Nobel. They say that a thinsetted joint will eventually weep water.
The fleece-covered NobelSeal will not form a watertight joint with another fleece-covered membrane unless NobelSealant is used. Whether it's a $10 bag or a %$50 bag, thinset or any form of cementitious product won't do the trick with NobelSeal. It's not like Kerdi where a 2" overlap of thinsetted fleece-on-fleece will do the trick.
With the NobelSeal membrane over Ditra, the beads of NobelSealant will only seal the overlap if the beads of NobelSealant are in continuous contact with the raised orange waffle structure of the Ditra. NobelSealant will not seal if the bead is over a thinset-filled Ditra cavity. Water can intrude by saturating the thinset in the waffle cavity, essentially going under the bead of NobelSealant and coming up through the other side.
Any water intrusion from these overlaps will likely not show in a standard flood test. It'll take time for the joint to saturate, then capillary action will take over.
Without a doubt I applaud your efforts to do better-than average-construction. You have a great attitude in that regard.
Again, everything above is from the respective tech departments.
David
Original Author14 years agolast modified: 9 years agoJohn,
Would I be correct in assuming that you're building a 2% slope on top of the DITRA?
Then there will be tile?
Will the Quickdrain be siliconed in with the tile edges?
Thanks,David
MongoCT
14 years agolast modified: 9 years agoI though the Ditra was sloped. I hope the Ditra is sloped. Regardless, I think I'll retire from this one.
My best to all of you.
johnfrwhipple
14 years agolast modified: 9 years agoThe Ditra is sloped at 1/4" per foot towards the drain.
I know that Quick Drain USA recommends their Noble Sealant for the installation but I have never had good success with any type of chaulking in a shower area except a little silicone here or there.
The connection point between the Ditra and the Nobel flange attached to the drain is not my primary waterproofing connection. The Ditra provides an uncoupling membrane for my mud base and the build up to allow the drain to sit a hair off the concrete floor.
I have Kerdi'd this entire shower and brought the Kerdi up to the edge of the drain and in doing so completely cover any trace of the Nobel Seal. This Kerdi will be my secondary waterproofing layer as I now plan to use Mapei's Mapelastic HPG as my primary.
I was orginally going to stick with my Kerdi approach but value Mongo's insight and feel this will be a safer approach. I don't think that the water will weep through the Grani Rapid but can't say for sure for sure so I'll add in yet one more step.
I think a training day is in order for me and my crew and some time spend with a Nobel Rep would be great. Had I been trained by Nobel I would have used their products start to finish - with some much being invested in this bathroom another $50.00 in material is peanuts in the big picture. I'm sure I can arrange some training up here in Vancouver and will make some calls once things slow done a bit.
I'm walking down a new road with this installation and want it to turn out right. I have never set tile of Stryfoam and most likely never will. I have never used chaulking as a primary waterproofing and don't think I like this idea. I did test the Quick Drain and flood tested it overnight and it held well. It is hard to change your ways and often the old ways are better than the next best thing.
My client is planning a second bathroom renovation in a couple of years and with this back to back bathroom renovation we will be able to inspect from below again with the camera for leaks. I'm planning on investing in a thermal imagining camera and armed with such a toy and a moisture meter and much closer look at these installs can show my failures or showcase my design.
One thing is certain - my client will get exactly what they want and if they have any problems I will receive the phone call. Ripping out this shower base would be a pain but is not the end of the world. I will sleep easier over the next two years using my tried and true installation methods vs trying out new products and waterproofing with a chaulking gun...
My thoughts. Thanks Mongo I hope you stay around I try a little harder when I know you are going to be looking at my work with an Eagle Eye.
Mongo has pointed out the proper installation methods above and again this is how you should do it.
davidro1
14 years agolast modified: 9 years agoin any case, davidtay, the mortal to the story is "say no to overkill". If it gets to the point that you have two membranes, everywhere, then H20 molecules stuck in the middle have nowhere to go and this can eventually lead to another problem. We can't see how much overlapping there is of these two membranes in the pictures above and maybe we don't want to ask now. Good job.
David
Original Author14 years agolast modified: 9 years agoOnce again, thanks to all. I now have enough information that I have a clear idea of what to look for, stop worrying about the shower pan and move onto other things.
David
johnfrwhipple
14 years agolast modified: 9 years agoI think I will leave this alone as well from here on end.
Hope your project goes well.
I hope to see more examples of curbless showers soon on this forum. With so many people inquiring about level access showers it will not be long before more jobs are built this way.
With all the answers online - and all the code available at fingers reach - how hard can it be???
Look for this shower's finished pictures in about 8 weeks time.
Regards,
John Whipple
By Any Design Ltd.MongoCT
14 years agolast modified: 9 years agoI've gotten a couple of email requests, so I'll try to clarify one other thing for some readers regarding the Noble products.
John is 100% dead-on correct to not depend on "caulk" for primary waterproofing. Caulk should be considered cosmetic. Sure it can shed water, but primary water shedding should assured through gravity and properly lapped membranes.
One thing that has to be realized though is that NobelSealant and NobleWeld are different animals than regular caulks.
NobleSealant is a high-rubber solids product that is designed to seal fabric-covered NobleSeal to itself. NobleWeld is designed to chemically weld CPE together. NobleSeal, the blue membrane, is simply fabric-covered CPE.
So to seal one piece of overlapped, properly pitched, and fabric-covered NobleSeal membrane to another, you can use two beads of NobleSealant just as Noble specifies. While I'd be comfortable with that, if you want an alternative...something more "bulletproof"...you can wet the fabric covering on the edge of the sheet of NobleSeal with xylene. That'll release the fabric from the underlaying CPE membrane. Then use NobleWeld to chemically fuse the bare strips of CPE to one another. Chemical fusing pretty much makes the two sheets of CPE into a single sheet. That "alternative xylene" method is approved by Noble.
Respectfully to all,
Mongoantss
13 years agolast modified: 9 years ago"I know that Quick Drain USA recommends their Noble Sealant for the installation but I have never had good success with any type of chaulking in a shower area except a little silicone here or there. "
And why should anyone trust you and your hunches over a company's tech dept. and engineers who have tested their product AND warranty it?
Right.
DO what you want , but don't dispense bad advice to the public under the guise of an expert.
johnfrwhipple
13 years agolast modified: 9 years agoA picture is worth a thousand words - a video maybe more.
johnfrwhipple
13 years agolast modified: 9 years agoI have been looking into approval ratings for these channel drains. I requested a cUPC report from Quick Drain USA to have on file and thought it might be handy for any of you out there in planning to provide with your plumbing specs.
I can email you a copy and will work on finding a direct link in the mean time.
Quick Drain USA - cUPC Document - IAPMO Research and Testing Inc
Hope this helps.
Insure that your channel drain is rated as a primary drain and not rated as a secondary drain. It has been mentioned to me that this is very important to look into and a second Primary drain may be needed with some new options in the Channel Drain Industry.
I think the second drain is a good call. I plan to do the same at my home. Over and above the all ready approved rough in.
But lets say that you are doing a tub to shower conversion. Would your local inspector get really that picky? Can you take that chance?
It has got me thinking. Thinking I don't know nearly enough - and I have much to test and learn in the near future.
I'm on it. Stand by for updates. It has been kind a busy "Changing the 'Box' "
JW
David
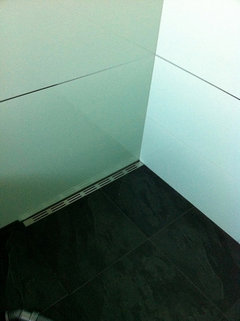
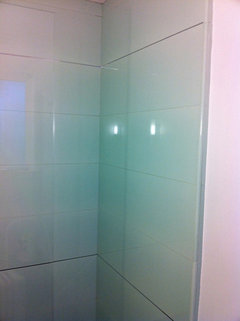
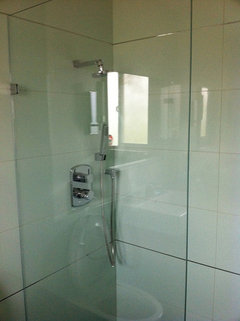
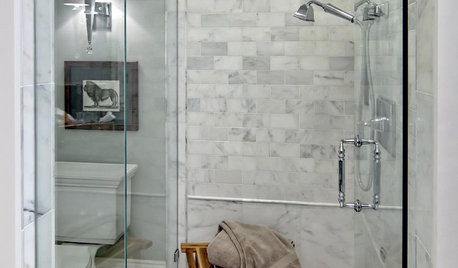
Original Author13 years agolast modified: 9 years agoKerdi over chicken wire floated walls, floor.
Flood tested 10hrs (leaky plug the first time) + 32 hrs.
Some pics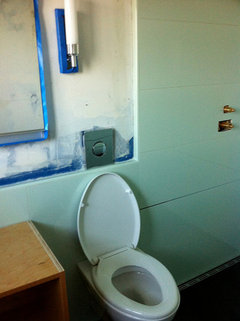
davidro1
13 years agolast modified: 9 years agolooks good.
the wall hung toilet goes well there. Makes it a "wet room".
David
Original Author13 years agolast modified: 9 years agoMore pics
Sink & wall hung

Night Lit Robern Uplift


David
Original Author13 years agolast modified: 9 years agoThanks
Some daytime shots
Robern Uplift & candre sconces
Shower valves

bill_g_web
13 years agolast modified: 9 years agoNice. Is there a hinged glass door in addition to the fixed piece of glass? If not, is the glass doing a good job of keeping water out of the room and what are the dimensions of the fixed piece. And how is the shower control placement working out for you? (Sorry to be so nosey - I'm in the planning stages and I like what you've done.) Did you do the work yourself? (Answer no even if you did if you don't want more questions:))
Bill
David
Original Author13 years agolast modified: 9 years agoThe glass is fixed ~ 74 by 78. Minimal splatter outside.
Shower controls work great, better than the previous pressure balancing valve. The controls were chosen primarily for ease of use over the years.
I did not do any of the tile work or glass install.
zinnah
13 years agolast modified: 9 years agoI have a very similar design happening, large format tiles, curbless with trench drain, floating vanity etc. I am very close to the glass install. Curious about your glass install. How is it secured so that it does not wobble? Floor to ceiling, wall brace, or? I am considering a panel about 72" high by 54" long, the length of the shower, fixed to the wall and secured to the floor without screws because of danger of puncturing membrane. Panel would be stabilized by a return panel 8-12" across the shower opening. We were going to try it first without a door. Thanks.
David
Original Author13 years agolast modified: 9 years agoI remembered one dimension wrong ~ 34 not 74.
There are 2 attach points and the bottom is caulked solid.
The width was not too wide to require additional bracing.
Talk to your glass installer prospects.
I think the installer I chose had more sense than the others. The others wanted to drill the floor right at the edge.
johnfrwhipple
13 years agolast modified: 9 years agoWHAT A GREAT FINISHED PROJECT!
Nice Work.
John Whipple
raro
12 years agolast modified: 9 years agoVery interesting bathroom. IN the last picture is a towel rack. Can you tell me about that? What is it? Thanks.
MongoCT
12 years agolast modified: 9 years agoI never saw the finale of your bathroom.
Nice!!
Are those metallic strips set into the horizontal grout lines? Schluter or something else? I like it, very slick!!
Bravo!!
And...an apology from me to you. Re-reading this thread, things got a bit off topic here and there. sigh...
David
Original Author12 years agolast modified: 9 years agoThanks mogo. No problem about the rest of the stuff.
Yes, those are metallic strips (Porcelanosa) set into the grout. They were originally intended for my kitchen.
Btw, I re-did the bathroom on the other side in a more conventional setup - shower over tub. When I get the time, I'll post pictures.
stangtjk
11 years agolast modified: 9 years agoHate to dig up an old thread but I'm redoing my tiny master bath and wanted to use one of the proline drains for a curb-less shower to give the appearance of more space. The bathroom is only 54"x90".
My question is in regards to the 2" requirement from the drain to the threshold. On the quick drain website "Installation at Entry to Curbless Shower on Wood" it clearly shows the drain being at the bottom of the slope of the shower level with the rest of the floor. Is this not acceptable IAW the UPC standards?
harry_wild
11 years agolast modified: 9 years ago" Is this not acceptable IAW the UPC standards?"
Best person to answer this is the local "building inspecter"! He has final say about being acceptable or not!


johnfrwhipple