Shop Products
Houzz Logo Print
enduring

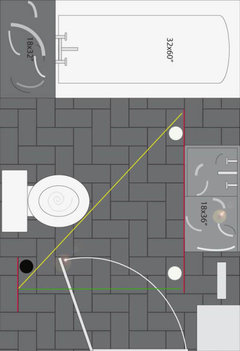
Question Re: Tile cutting/sizing 12x12 down to 12x6

enduring
12 years ago

Experienced tile folks I'd be grateful for your help on this idea I have of cutting down my large *12x12* Brazilian slate tiles into *6x12* tiles.

I have 11 13/16" x 11 13/16" tiles. So with a 3/16" grout line that makes the 12 inch/sq tile.

I want to see if I can cut these into *6x12* tiles so I can make a pattern.

Will the blade take out enough when cutting down the large tile? Or, do I need to get a blade that will take out the 3/16" that I need to take out of the middle of each 12x12 so that they fit - with my layout using 3/16" grout lines?

I believe that after the cut down of my 11 13/16" x 11 13/16" I should have 11 3/16 x 5 13/32". This size tile should fit into a pattern of my larger tiles *12x12*, RIGHT?

I might want to make a herringbone floor, should this same cut work for that?

Any advise will be so helpful.

Comments (17)

  • sweeby
    12 years ago
    last modified: 9 years ago

    A normal tile saw blade will not cut out the perfect width for you, so they are unlikely to be perfect -- and if that matters to you, plan accordingly.

    What I mean is that for a herringbone pattern made with all half tiles, your pattern would be fine even if your dimensions are not perfectly 2:1; and if you're careful to lay the cut edges all in the same direction, then your result is likely to be very good.

    But a pattern that mixes 12x12 and 6x12 into a blended field is likely to show a slight difference in the grout widths unless your cuts are perfect. If your grout is a close color match, this may be acceptable to you. But if you're a perfectionist, nothing short of perfection may be acceptable, and a simple 'cut in almost half' will not be perfect.

    Also look CLOSELY at your tile edges. Are they perfectly straight-cut? Or is there a micro-bevel? If they're perfectly straight-cut, then your match will be better than if there's a micro-bevel.

    One other consideration -- Sometimes you can buy tiles in both a 12x12 and 6x12 dimension for the types of complex layouts you have in mind. If the tiles are MOLDED into those sizes, they should work well. But just because they're SOLD as 12x12 and 6X12 doesn't necessarily mean that their 6x12's aren't just cut-in-half 12X12s. We've learned that one the hard way...

  • MongoCT
    12 years ago
    last modified: 9 years ago

    "I believe that after the cut down of my 11 13/16" x 11 13/16" I should have 11 3/16 x 5 13/32". This size tile should fit into a pattern of my larger tiles *12x12*, RIGHT? "

    I'm not sure if that "11 3/16 x 5 13/32" is a typo or not, but if the 11-3/16 was supposed to be 11-13/16, it still won't work with the 5-13/32" width if you want uniform 3/16" grout lines everywhere. Here's a little bit on herringbone patterns:

    If you look closely at a herringbone, you can see that for a "perfect" layout, you want the tile length to be equal to twice the tile width plus the grout line width:

    TL = 2TW + GLW

    Let's use your whole tile of 11-13/16th square, and we'll use the 11-13/16ths as the tile length:

    11-13/16 = 2TW + 3/16
    11-10/16 = 2TW
    5-13/16 = TW

    So you'd want your tile size to be 5-13/16 by 11-13/16. Can you get two widths out of each tile? Two times 5-13/16 is 11-5/8. So you are exactly correct with the statement in the middle part of your post; if you used a blade with a 3/16" kerf and cut right down the middle of each tile, you'd end up with two properly sized 5-13/16" by 11-13/16" tiles.

    That's assuming all the good stuff: The tiles are perfectly square and uniform in size, and your cuts are magnificent in their accuracy. If you have that going for you, no doubt when you look outside your bathroom window you will indeed see rainbows and unicorns. It'll be a good day indeed!

    Regardless, I usually recommend gridding floors instead of using tile spacers. Here's a little example why. Look at the following diagram:

    What I'm going to do is run measurements across the floor. You can see that the red lines are parallel to each other, but we're going to take two different paths to get from the red line on the left to the red line on the right.

    Following the yellow line, the distance across the floor is:
    9 tile widths plus 8 grout lines, or
    9 x 5-13/16 + 8 x 3/16 = 53-13/16"

    Following the green line, the distance across the floor is:
    5 tile widths plus 2 tile lengths plus 6 grout lines, or
    5 x 5-13/16 + 2 x 11-13/16 + 6 x 3/16 = 53-13/16"

    So with tiles sized like that (11-13/16 by 5-13/16 with a 3/16" grout line) you could use tile spacers, or you could grid the floor. Either way your installation will be perfect.

    If your tiles were not perfectly uniform in size, or not in that perfect herringbone proportion, you can see that the tile spacers would throw the installation off as you went across the room. Gridding the floor with "un-perfect" tiles would still you a symmetrical tile layout in terms of your grout lines staying aligned, but your grout lines would be fudged 1/16" here and 1/32" there to stay on the grid lines.

    While this isn't related to your specific scenario, I'll toss this out for anyone who cares: a lot of folks will run a herringbone with a 2:1 proportioned tile. For simplicity, let's say a 6" by 12" tile with a 1/4" grout line.

    Using the above pic again, if you used 1/4" tile spacers, the yellow line will be 56" across the floor from red line to red line, but the green will be 55-1/2". The pattern will "bend" or "curve" across the floor if you were to use a 2:1 tile with tile spacers.

    Due to the pattern of the herringbone, the curve is often hidden from the eye in the field of tile itself. But you can see when you hit the wall on the right, you'll have a whole tile width up at the top (yellow line), but you'll have to fill in that roughly 1/2" gap on the green line with a sliver of tile.

    That's where gridding comes in. If you grid a floor with 6x12 tile and a 1/4" grout line, you can sort of "split the difference". The top is 56", the bottom is 55-1/2". So we'd grid that red line to red line at 55-3/4", splitting the difference.

    Following the yellow line, we need to lose 1/4" across those 8 grout lines, so instead of 1/4" wide they'd be 7/32" wide.

    Following the green line, we'd need to stretch the run by 1/4", so the grout lines there would be a little over 9/32" each instead of 1/4".

    So it all depends on what you want. Perfectly proportioned tiles will give you a perfectly symmetrical layout and perfect grout lines.

    Tiles that aren't perfectly proportioned, you'll ether "curve" the pattern across the floor if you use consistent grout line widths, or you can fudge the grout line widths a bit to maintain an even and symmetrical tile pattern.

    I hope that makes sense!

    Best, Mongo

  • michoumonster
    12 years ago
    last modified: 9 years ago

    i was thinking of cutting some 6x6 marble tiles to make 3x6 subways. i know some people have done this successfully. i think it will be pretty labor intensive because you have to tape each tile to cut to minimize breakage and chips, then might have to smooth and polish out the rough edge, etc.
    i am still waiting on feedback from my GC to see if he is willing to do this for me.

  • enduring
    Original Author
    12 years ago
    last modified: 9 years ago

    Mongo, Thanks for posting!! Yes I had a typo - I was meaning 11-13/16 x 11-13/16 cut into halves and making 11-13/16 x 5-13/32. Now with your equation I see that my half tiles should be 5-13/16" and not 13/32's. I think I was just guessing at the 13/32", trying to split the difference between half of 3/16...or something :) It was a picture in my head.

    I wish we used metric, cause I struggle with fractions in equations. I convert to decimals, then try to get back to the fractions. Any way, working the equation and testing it several ways, it all works out as you said. Let me just say you have a beautiful equation... but I was just sure the picture in my head was on the right track.

    I would like to split the difference between the grout lines so that the walls don't have wedges inserted. I don't think I will mind a few varied widths in the grout lines, to keep the tiles lined up and not traveling an arc. My space is small, about 50sf.

    The slate tiles are nicely cut and gaged. I looked around at other tiles and these slate tiles are good for what I have available locally.

    Mongo, So every thing you said makes sense to me except for the "grid" part. How do you make a grid? Wouldn't I be covering the marked grid with with thinset and loose my bearings?

    Second, If I rented a tile cutter would that be a better tool than my small $80 wet saw? I would be willing to rent one for a few hours cutting the best cuts I can, if it will make a difference. The fence on my small saw is worthless.

    Michoumonster, good luck on your tile. Angi DYI, did a great job on cutting her large format tile down to smaller squares. She posted on the kitchen forum several months ago regarding that part of her kitchen remodel.

  • enduring
    Original Author
    12 years ago
    last modified: 9 years ago

    Mongo, another question, will it make a difference in my tiling if I use a larger grout line? I wouldn't think it would make any diff.

    Using the equation above:
    TL = 2TW + GLW
    11-13/16=2TW+4/16
    11-9/16=2TW
    5-25/32=TW

  • MongoCT
    12 years ago
    last modified: 9 years ago

    Gridding...you can go as small or as large as you want. I'll vary depending on the pattern, for this example with your floor I went what I'll call 3 units by 3 units.

    You'll notice my lines aren't perfect, but they should be where the grout lines run.

    The size of the grid for this floor would be 1TW + 1TL + 2GLW square. 5-13/16 + 11-13/16 + 2 x 3/16" = 18" square.

    Now, I work from the bottom of my grid and from the left of my grid. Meaning, the tile edges on the left side of the grid touch the left grid line and the tile edges on the bottom of the grid touch the bottom grid line.

    The tile edges on the top of the grid will be one grout line width away from the top grid line and the tile edges on the right side of the grid will be one grout line width away from the right grid line.

    By habit, I tile from the bottom left of the grid and work to the top right of the grid, but that does depend on the pattern. Using a grid at the bottom of this post as a reference, I'd:

    1) Set tile #1 with the bottom touching the bottom grid line and the left side of the tile touching the left grid line.

    2) I'd set tile #2. It'll touch the bottom grid line and be 3/16" away from tile #1 and 3/16" away from the right grid line.

    3) Tile #3 would be set with its right edge even with the right edge of tile #1, with its bottom edge 3/16" away from tile #1, and it's top edge 3/16" away from the top grid line.

    ...and so on.

    That's gridding.

    A couple of nice things about gridding:

    1) variations in tile size, or globs of thinset between tile that might impinge on tile spacers, will not throw off your spacing. You simply obey the grid lines.

    2) It's great for patterns like the herringbone, or a pinwheel, or whatever, where the pattern might "walk" or "curve" across the room because the tiles are not perfectly proportioned.

    3) In a large room, one worker can start on one corner of the room, another person in the other corner, and you can meet in the middle, knowing that everything will line up perfectly.

    4) A bathroom like yours that has obstacles; a vanity, a toilet, a floor vent, you can follow the grid lines around these obstructions and fill in the cut pieces later.

    Now, keeping your lines. I have an ink line, which is like a chalk line but it dispenses indelible ink instead of chalk. You can still use a chalk line. Snap your lines, then spray over the line with a quick squirt of hairspray. The hairspray will keep the chalk line intact.

    When you thinset, you'll usually use a 1/4" notched trowel. Spread the thinset on the substrate with the flat edge of the trowel, then when you comb it with the notched edge of the trowel, your grid lines will be visible in the valleys of the thinset.

    I do know people that use a straight edge and a sharpie marker to draw grid lines.

    If you can't get that technique down, or your husband will get ticked off if you use his hairspray, then you could just thinset inside the grid lines, right up to but not sullying the grid lines.

    Thinset a grid, tile a grid, move on. You can see with this herringbone pattern that some tiles go over the grid lines. You just go with the flow. Think it through and it'll all make sense.

  • MongoCT
    12 years ago
    last modified: 9 years ago

    If you rent a good tile saw, sure it can work wonders. Just make sure the blade is parallel to the fence, etc.

    FWIW, I still have a little mini wet saw, it looks like a mini table saw. The fence on mine was horrible to, so I'd clamp a straight edge to the table top and use that as my fence.

    No worries about metric versus fractions. I learned in grade school that the United States will be transitioning to metric in 1972, so metric is indeed on it's way. It's just running a little late.

  • enduring
    Original Author
    12 years ago
    last modified: 9 years ago

    Thank you so very much Mongo, you do a superb job of explaining things. I remember you telling me on a previous post about a small wet saw, thanks for reminding me. My husband doesn't have enough hair for spray so I think I'll use some cheapy brand; it is a wonderful tip. I can do this, I pulled it off on my kitchen backsplash with even less information and the herringbone ran on the diagonal. Those tiles were pre cut and I am thankful that they were, because I didn't have a clue to the problems that could have developed if they weren't. They were apparently cut to your equation because they matched perfectly.

    Crazy spacing, I like the grid tech for the floor:) I remember taping my 45* drafting square to the sides of these sections for drying overnight. One night I stayed up all night to tile. It was fun though. This was my first wall, I got better on the second wall as seen in the 2nd pic:

    I just picked a center spot over the stove location and started - it wasn't exactly centered though, The grout was still wet at this point:

    You've just boosted my confidence, and others if they are following this post. Thank you so much again Mongo, for your help on this project, and on all the other projects that us lost souls post on GW.

  • MongoCT
    12 years ago
    last modified: 9 years ago

    I'm glad it was easy to understand. It can sometimes be difficult to adequately relay techniques in a post.

    Your herringbones look great! Is the tile a soft green (if it is, I love it) or is that just photo funny-ness?

  • enduring
    Original Author
    12 years ago
    last modified: 9 years ago

    Mongo, the tile is a mix of soft grays, bluish grays, and tans. Some look a bit green too. The undercounter lights cast a green color when I take pics with them turned on. Also that paper on the counters was green. Here is the tile in natural light. The wall paint & trim is a BM gray green white called Titanium. And thanks for the complement on my installation:)

  • michoumonster
    11 years ago
    last modified: 9 years ago

    enduring, did you ever end up doing the 6x12 herringbone in your bath? i would love to see how it turned out!

  • enduring
    Original Author
    11 years ago
    last modified: 9 years ago

    Michoumonster, thanks for asking and I am glad you're wanting to see the finished project.

    My progress is slow. The floor will be done in herringbone though, because I love it and, because I got the word from Mongoct that after he gave me all this help, I was committed to the herringbone ;)

    We've now got the additional joist in place that provide the structural support needed for stone tile. We still have to lay down a sheathing of plywood, install the underfloor heating, and finish off with self leveling compound. All this before I tile (using Ditra).

    Now I have a deadline, the plumber is coming to do the rough-ins and place the tub next Thursday. I'll need to have the self leveling compound done before the tub goes in. Once the floor prep is done and the tub in place I will tile.

    I'll keep everyone posted.

  • bill_vincent
    11 years ago
    last modified: 9 years ago

    Excellent instruction, Mongo. The only exception I would make is that with herringbone, so long as the tile is rectangular, the width does NOT have to be exactly half the length minus the grout joint. You can even use "strip" tiles, (something like say, a 2x12) to make a herringbone design. Take a look at the design. Most people only see the zig-zag pattern. But if you look at it for a minute (and I'm sure you've seen this if you've ever laid it in), you'll see it's a pattern of "steps", first with the rectangle facing one direction, and then with it facing the other. You simply step it back the width of the tile, whether it be half width, 1/4 width, or even 3/4 width. It's all the same, and will work.

  • enduring
    Original Author
    11 years ago
    last modified: 9 years ago

    Yes Bill, I know what you mean about the extra long to width ratio. Like this right?

    or this:

    VS this:

    What I want to do is the 1:2 ratio though. Just like the old sidewalks were where I grew up. Sort of like this look:

    But with black slate, & in a more modest size version of this:

    AND I am just about to start a threat called "Which Grout Color Should I Use?" :)

  • bill_vincent
    11 years ago
    last modified: 9 years ago

    Enduring-- understood. My point was the tile width doesn't have to be exactly half the length minus the grout joint to get the look you're going for. IOW, if your tile is 12" long, it doesn't have to be exactly 5 13/16" wide. If it's 5 1/2", or even 6 1/2", you'll still be fine, and still get the look you want.

  • enduring
    Original Author
    11 years ago
    last modified: 9 years ago

    Thanks so much for the help Bill.