


Hexagon tiling help!!!
Help!! Tile laying disaster!!
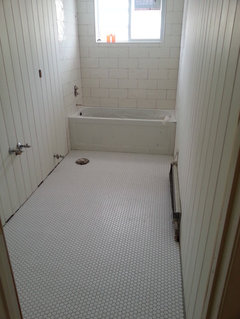
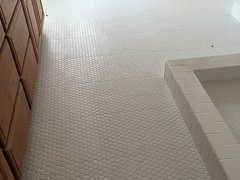
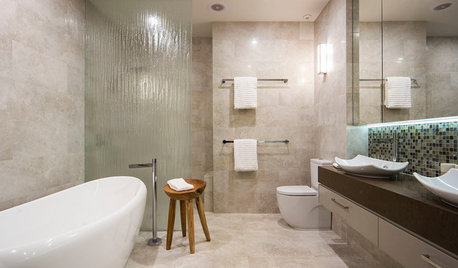
My partner and his father just laid hex tiles in our main bathroom...and the majority of the edges of the tile sheets are touching the next sheet, or are very close to touching. So in some spots, there is no space to put any grout at all.
I don't know if there is anything we can do to fix this???
We have ditra underneath them, and under the ditra is self-leveling cement which is on top of our floor heating cables.
This was the part of the reno I was most looking forward to, and now I am just trying to see if it can be salvaged at all, or if we have to rip it out. I don't think I can afford to rip it out and buy all new tile, ditra, etc...oh boy, what a disappointment!
Any advice/suggestions would be greatly appreciated!!

Comments (44)
Related Professionals
Queen Creek Kitchen & Bathroom Designers · Covington Kitchen & Bathroom Designers · Citrus Park Kitchen & Bathroom Remodelers · Beverly Hills Kitchen & Bathroom Remodelers · Fair Oaks Kitchen & Bathroom Remodelers · Idaho Falls Kitchen & Bathroom Remodelers · Middlesex Kitchen & Bathroom Remodelers · Fairmont Kitchen & Bathroom Remodelers · Windsor Glass & Shower Door Dealers · Burr Ridge Cabinets & Cabinetry · East Setauket Window Treatments · Ferndale Window Treatments · Seattle Window Treatments · Stony Brook Window Treatments · Grosse Ile Window Treatments
MongoCT
10 years agolast modified: 9 years agoA couple of options:
1) Rip out and redo. As you wrote, financially that may not be an option.
2) Pop out the tiles that are touching. Clean any cured thinset off the backs of the tiles, and use a tool (screwdriver for example) to carefully "smooth away" some of the cured thinset that was under the tiles that were popped off. You simply want to make a bit of room for new thinset.
Those individual tiles can then be individually reset. A little dab of thinset on the back of the tile, then carefully pop it back it place. You'll probably get a little bit of thinset squeeze out into the grout joints. Don't worry about that now. Come back several hours after the tiles have been reset and use a utility knife to scrape the thinset out of the grout joints. It'll "slice out" fairly easily. Obviously be careful with the knife, you don't want to go so deep that you slice and dice your Ditra.
If you have 1/8" grout lines and you simply pop off one of the touching tiles, when you reset it you'll split the good 1/8" grout line into two 1/16" grout lines.
You can improve your visual odds by popping off both of the touching tiles. By sliding them both over a tad, you'll have three grout lines that are 1/12" wide.
Going from 1/8" to 1/12" then back to 1/8" is less of a differential than going from 1/8" to 1/16" to 1/8". I hope that makes sense.
Regardless, when you grout, if you use a grout color that is similar to the tile color, the grout and tile will blend together and visually it'll help hide any wonky grout lines. On the other extreme, if you use a dark grout, the contrast would make the individual tiles pop and accentuate any wonkiness in the pattern.
If you do pop off individual tiles, consider having a roll of blue painters tape handy for when you reset them. You can reset a few, then put a strip of painters tape over them. That'll prevent them from shifting as the thinset cures. The alternative would be to have a zillion little shims. Even folded cardboard would work as a shim.
Be careful when resetting them that you set them at the same elevation as the existing tile. ie, don't set them too deep or too shallow.
Hope that makes sense. Good luck!
This post was edited by mongoct on Wed, Feb 5, 14 at 11:04
scerrir
Original Author10 years agolast modified: 9 years agoHi williamsem!
Thank you so much for providing the name of that site. I opened a thread and someone has replied.
It turns out the gentleman who replied said that I would have much bigger problems since ditra has a minimum of 2x2 tiles to be used with it...and my hex tiles are 1x1. And low and behold, when I get home from work, my partner informed me that the floor is border-line bumpy - I am assuming it has something to do with the 1x1 tiles on the flexible mesh vs using the ditra with larger solid tiles.
It actually looks as if we will have to rip everything out - for more than just my issue with the sides of the tiles touching eachother.
Rhea
scerrir
Original Author10 years agolast modified: 9 years agoHi mongoct!
Your reply was absolutely amazing!!! Seriously, thank you so much! Because as I was reading it I thought there would have been a chance to salvage it using this method. But then we ran into the issue of the floor not being flat...so now it is not even just a look thing - it is a feeling thing too, and we do not want that to cause troubles down the line...not sure if it would?
Do you think it would be fine? I wonder if it is just again an aesthetics thing, or if now that is actually a big problem.
The thought of all that money down the drain makes me short of breath a bit...but this is definitely something we are learning from. Do more research!
Rhea
sloyder
10 years agolast modified: 9 years agoI noticed the bumps to. Also I would dry fit the tiles before laying, as some look awful tight to the wall no room for adjusting, especially near the door.
MongoCT
10 years agolast modified: 9 years agoDitra! I missed that!
You could be okay with Ditra, where you can mostly run into problems is if you wear high heels in the bathroom.
I'm guessing you set the Ditra yourself? Remember its raised grid or waffle structure? The waffle structure results in "voids" underneath the ditra. In a worst-case scenario, one of your little hex mosaics could be sitting on the raised ditra grid (over a void) with the edges of the hex not supported by the thinset fill recesses in the Ditra.
If a point load (example, a high heel) was put on that single hex, it could push the hex down and collapse the waffle.
I've been using Ditra for coming up on 20 years. Schluter has always had that 2" minimum, and I know people have installed smaller mosaics over Ditra, but I've never heard of a waffle collapse. Regardless, that's the reason for the 2" minimum restriction.
The bumpy floor. If the Ditra was flat and it's just the mosaics that got set bumpily (is that a word?), for future tiling, set the mosaic mesh sheet on the thinset and then use a rubber grout float to tamp the mosaic sheet into the thinset. You want a pure up and down motion.
Pressing a sheet or mosaic into the thinset with your hands can result in uneven pressure across the sheet. Using a rubber grout float or a piece of 2x6 covered with a pad will give a more even pressure across the entire face of the sheet.
Good luck with it!
 PRO
PROJoseph Corlett, LLC
10 years agolast modified: 9 years agoscerrir:
I'd grout that thing before demolition. You're like a guy that's jumped 7/8 of the was across a creek; you may as well land on the other side and see what it looks like. Grout is hardly going to make the demo much worse and it just might be acceptable.
scerrir
Original Author10 years agolast modified: 9 years agoHi mongoct!
Once again, your response was so helpful! I am going to forward the link to my partner so he can read up on it, for after we rip it up.
I am just not sure if leaving the floor as-is [bumpily...loved the word :) ] is good. I know I will never wear high heels in the bathroom, but I am thinking of just the uneven ground...will that result in another problem down the line?
I am also not sure if this is our forever home and I think as a home-buyer if I walked through that bathroom I would have serious concerns as to what was going on under the tiles...
scerrir
Original Author10 years agolast modified: 9 years agoHi Trebruchet!
I absolutely see what you mean. But I am now kind of more concerned about the unevenness of the floor. When walking on it, it does not feel flat like normal tiles. It feels like it dips in some areas...it's so odd!
Two issues in one now unfortunately. :(
scerrir
Original Author10 years agolast modified: 9 years agoHi mongoct!
So we have made the decision to rip out the tiles...I think it might bother us down the line with the floor being "wavy"...sort of feels as if we are walking on sand on the beach. It's nice when it's on a beach, but not so much in our main bathroom...
Can the heating cables be undamaged while doing this step? From what I understand, the cables are under the self-leveling cement, then a layer of thin-set was put down and the ditra mat layed, then the thin-set and tiles put on top.
The ditra appears to be plastic on one side and felt on the other. Is it possible to easily rip the plastic away from the felt and not damage the cement covering the heating cables??
We are kind of worried about this next step!!
Rhea
raehelen
10 years agolast modified: 9 years agoRhea,
Have you considered changing the tile to something that is 2X2 or larger, and just keeping the Ditra in place?
We just went through having to rip up a very small portion of our shower and floor tile, (like you our fault, in hindsight can't believe we made the mistake we did), but we had 12 X 24 tiles and they had to be hammered to bits to remove, and the Ditra was fine underneath. So my point is, with your small tiles on sheets, I'm guessing you will be able to remove them without damaging the Ditra. I think I would be leaning towards changing the tile and not having to 'waste' the Ditra or compromise/risk damaging the heating.
scerrir
Original Author10 years agolast modified: 9 years agoHi raehelen!
I really love the hexagon tiles...so I think we are just going to buy a new batch of it and literally try again. So I don't think we can use the ditra again or else it will turn out the same way. It feels like we are walking on sand lol. Not good! I know we can definitely live with it the way it is, but it is our main bathroom and we will be in it all the time so I think it's a mistake we have to pay for now.
I just don't know if there are any particular methods or tips to follow when chipping out tile. My number 1 concern is making sure the floor heating does not get damaged at all...
Rhea

enduring
10 years agolast modified: 9 years agoI have installed uncoupling membrane and tile twice. Both times over SLC and floor heating wires. The ditra was hard for me to get smooth. That may actually be your problem too. Did you use unmodified thinset under the ditra? That is what is recommended by the company. If you did, it might be easier to lift the ditra off the floor. When I did my first floor I had very large hills in my ditra. I cut out those areas and scraped the thinset down to the SLC. Then I put new ditra patches in place. I did not seam the patches to make it waterproof, but you could I think. As a DIY, it was not perfect, but I am happy with my work. I used 12x6 tiles though. On the second floor I got a little better, but there was still some bumpiness to the uncoupling membrane, but not bad. The large tiles seemed to workout ok.

weedyacres
10 years agolast modified: 9 years agoYou don't have to pull out the Ditra, just chip all the tiles off of it and scrape off the thinset. It's ok to leave the thinset in the waffles, as the new batch will bond to it. Even if the Ditra is a bit wavy, you can use the thinset between it and the tiles to level out the floor.
Like Mongo said, use a grout float to press them all even so they're flat the second time around.
MongoCT
10 years agolast modified: 9 years agoIf you want to demo the hex off of the ditra, try using something like a mason/brick chisel, less than $10:

Start at the bathroom door where you have access to the edge of the hex. Hold the chisel at a fairly low angle with the chisel edge on the thinset line and you should be able to cleave the tile off of the Ditra.
Clean up the Ditra and see what type of surface you have. If it's flat and in good shape you can re-tile over it. If it's a bit dippety-doo, you could consider feathering it flat with thinset. Or if you have the elevation to play with, you could level it with a thin overlay of SLC and then tile over the SLC.
If you do want to demo the Ditra, you could try peeling it up, It's likely that it might delaminate a bit and you'd leave some of the Ditra fleece behind. Clean it up, then I'd recommend SLC and tile over the SLC.
Because you have RFH under the Ditra I'd prefer to not mess with the SLC and that might mean leaving the Ditra in place. If you really want to try to remove the Ditra you certainly can. But if you start pulling up the Ditra and it starts chunking out the SLC?
Have a meter on hand to check the resistance of the RFH cables. Good to check before you start demo to get a base reading, and recheck during/after work so you know there's no damage.
scerrir
Original Author10 years agolast modified: 9 years agoHi mongoct!
Thanks for the tips...I am going to send this to my b/f to see which one he wants to do!
We were thinking the ditra would detach from the fleece part easily and then we would have the thin-set over the SLC left over. But you are saying that it will not come off from the fleece, and might actually take the fleece and part of the thin-set & SLC with it?
Oh boy.
My worry is if we leave the ditra and re-install the hex that we will run into the same problem. Although we plan on hiring someone to do it. I wish we could hire you!! lol.
I actually wish we never put the ditra down because after the SLC was put down it was smooth as glass!
Rhea
scerrir
Original Author10 years agolast modified: 9 years agoHi enduring!
We did use un-modified thinset to attach the ditra to the flooring...so I really hope that helps make the demo easier. I am nervous about it.
MongoCT
10 years agolast modified: 9 years ago"We were thinking the ditra would detach from the fleece part easily and then we would have the thin-set over the SLC left over. But you are saying that it will not come off from the fleece, and might actually take the fleece and part of the thin-set & SLC with it? "
If the Ditra was wonky after it was installed, then sure, your best bet is to demo back to the last smooth surface you had, which now sounds like it was the SLC, and rebuild from there.
How things come apart? It's all about bond strength. If the SLC has a stronger bond to the Ditra than it has to the subfloor and you simply brute-force yank up the Ditra, the SLC could delaminate off of the subfloor and come up with the Ditra. Or it might not.
But since the last thing you want is to damage is the SLC and the RFH, I'd start the job using some sort of mechanical assistance instead of brute force.
I'd remove the tile first.
Then I'd work on a corner or edge of the Ditra, with a corner loose I'd grab the corner with a pair of pliers or vise grips. While pulling the Ditra up, I'd chip away at the thinset that bonds the Ditra to the SLC, trying to not damage the SLC.
Once you get a flap of ditra loose, you may be able to fold it back and brute-force pull the Ditra to separate it from the SLC. If the Ditra starts to delaminate. or if the SLC starts to break up, then it's time to slow down and attack the thinset that bonds the Ditra to the SLC.
If you want help, consider getting an oscillating multi-tool and a package of diamond blades or carbide "grout" blades.
With one person pulling up on the ditra, the other can gnaw away at the thinset layer between the Ditra and the SLC, either with the low-tech and low cost mason's chisel or with the high-tech and more expensive multi-tool. Or a combination of the two.
FWIW, if you have a lot of DIY projects in your future, the multi-tool is pretty darn versatile.
You might find that things come apart with amazing ease, or that the bond is tenacious and it'll be a cuss-a-second job. You just never know with demo.
Find a method or technique that works for you and embrace it. There is no one right answer. Quite often I shift gears mid-task and change methods or tools for increased efficiency, especially if working alone.
You might find the Ditra pops off cleanly and you'll wonder what the fuss was all about. Or it might not. Or in some places it pulls up cleanly, in others you need some mechanical assistance. Go with the flow.
raehelen
10 years agolast modified: 9 years agoAs always, Mongoct is so generous with his time and has given you really thoughtful and useful advice.
To help remove the tiles we just removed, DH bought a Dremel multi-max. Since I had no fore-warning, I couldn't price it out before he bought it from HD. Turns out that was the most expensive place to buy it. Amazon has it much cheaper. There are two versions of kits that come with 20 accessories, the MM20-03, and the MM40-01. My husband bought the more expensive MM40 (of course), not sure if the MM20 would be good enough for you or not. But, from the minimal research I've done, the kits are the best deal, as it's in the accessories that Dremel really hits you, ie you'll save more by buying the kits (if you think you'll use them) than by having to buy each accessory separately.
I plan to take my receipt back to HD to get them to beat Amazon's price by 10%. But, if you decide that this would be useful for you, maybe you could get them to do the price guarantee as you buy it. Since they beat the price by 10% it's worth it.
Here is a link that might be useful: Dremel MM40-01
scerrir
Original Author10 years agolast modified: 9 years agoMongoct and raehelen,
Both of you have been so nice and helpful! I am extremely thankful for all of your tips and advice. And the fact that you were both so patient with my many questions - it speaks volumes about the kind of people you are :)
I am going to once again bring this to my b/f and we will work from there!! Here's to hoping (in the one and only case) that it was not a strong bond between the thinset and ditra! :P
Rhea
InTheBloom
10 years agolast modified: 9 years agoI feel for you, this is why I refuse to touch tile again. I leave it pros for now on. Your bathroom will look great when done, best of luck!
scerrir
Original Author10 years agolast modified: 9 years agoHi again Mongoct...
I am so sorry for bothering you again, but I have one more question...
My b/f and I are flip flopping back and forth like a fish out of water regarding whether we should rip the tile or just leave it the way it is.
Are there any negative side effects that will happen with the tile being wavy? Or is it really just personal preference whether you want to walk on flat tiles or feel like you are walking on the sand at the beach? lol.
In your honest, professional opinion, should we rip it? Or being the way it is, will it be fine?
I just cannot decide. And we want to decide by the weekend so we can start demoing or just move on with the renos...
Your thoughts???
Rhea
scerrir
Original Author10 years agolast modified: 9 years agoHi InTheBloom,
We have definitely learned our lesson! It's really those tiles too...because my b/f and his father put the shower wall tiles up and they did a fantastic job!
Rhea
MongoCT
10 years agolast modified: 9 years ago" I have one more question...should we rip the tile or just leave it the way it is. Are there any negative side effects that will happen with the tile being wavy?"
In your favor:
1)Things usually look better after they are grouted.
2) A toilet is going to cover part of the floor
3) A vanity will also cover part of the floor
4) Add a floor mat or throw rug, one in front of the vanity and one in front of the tub, and what have you got?Camoflage!
It's been down now for at least a week or two, if you grout it and find it acceptable, then there you go. You saved yourself a bit of work.
Do understand with the wavy tile you might need shims for the toilet, they actually sell small toilet wedges to prevent rocking commodes.
What you don't want is tile lipage so bad that it could be a toe stubber. If the floor is that bad, there is a chance someone could stub a toe and tear some flesh or split a toe nail.
Being porcelain hex, it is what it is. Were it a natural stone tile, you could actually have someone come in and no kidding sand it flat.
So if you've lost your enthusiasm for the demo, grout it and see how it looks. Another couple of days isn't going to dramatically change things.
Do understand that cement products get stronger as they age, especially over the first 30 days. It would have been fairly easy to demo within the first few days. After a week, more difficult. Two weeks? After a month, it is what it is.
Vertise
10 years agolast modified: 9 years agoInteresting thread. Wow, mongoct, you rock! Love to see a master at work!
scerrir
Original Author10 years agolast modified: 9 years agoHi Mongoct!!
Soooooo...we ripped the tile out! The tile we got out with the back of the hammer, and we were able to take the ditra off easily...I assume that must mean we didn't have it on right! Lol. But it worked out in our favour.
From doing this, we realized that the floor was uneven because the thin set under the ditra was not level.
We ended up buying levelquick rapid set and they put it on over top and we will be ready to go! We also bought the 1" hexagon tiles again for our 'do over" lol.
Now for the question...we might attempt to install them ourselves because tp have them professionally installed is around $1000...
Any tips on installing hexagon sheets? Should we use thin set mortar or tile adhesive?? Is one better than the other? Can we even use the adhesive on a floor? Is there a special technique or tools that would help us? We cannot seem to find spacers that will fit those...and we dont want to install them so close together again because of those lines...
Sorry for the story lol...
Rhea

prairiemom61
10 years agolast modified: 9 years agoUse spacers. HD carries them down to 1/16". So does Lowes. These tiles can be hard on the eyes as you are setting them, so definitely lay them out first, and then use spacers. This is not a job for eyeballing it. Good luck, and I hope you end up with the beautiful floor you envision!
enduring
10 years agolast modified: 9 years agoBe sure to get the thinset on perfectly under the Ditra, and when laying the Ditra be sure to get it down evenly. Don't put your knees or toes in the stuff trying to get it down. There are YouTube videos and product site videos that show how to install Ditra that can be helpful.
The tile needs to be laid with thinset not adhesive.
Mongoct's post on Wed, Feb 5, 14 at 19:30 tells about using a grout float or padded board to tamp the tile into place. Sounds like a great idea. The hand puts uneven pressure down on the tile and squishes the grout about.
hunzi
10 years agolast modified: 9 years agoAre you planning to use Ditra again?
I'm also going to be putting down 1in hex (which is apparently at Home Depot is closer to .8in hex ). I have read not to use Ditra with a tile under 2in, so I'm planning to use Nobel CIS as the crack isolation/decoupling membrane (Thanks Mongo for the product suggestion!)
I hate that you've had these problems but I've been learning a lot watching them (hopefully) before we set our 1in hex!
Oh and I've wondered something - when you said it felt like walking on the beach when you walked on the problem tile - did you mean it actually crunched under your feet or that it was really uneven and had lippage? Just wondering.
Always ;-)
Hunziscerrir
Original Author10 years agolast modified: 9 years agoHi hunzi,
Nope, I am not using any membrane now. We are just going to install the tile to the cement now. It's flat again, so we don't want to risk it!
There was no lippage, just wavy bumps... sort of like trying to flatten the sand to put a tent down...the bumps you feel when you are sleeping...haha.
Good luck!
Rhea
scerrir
Original Author10 years agolast modified: 9 years agoHi enduring,
We are definitely not using ditra again. Just going to install it on the self-levelling cement.
I will re-read mongoct's post, thanks so much :)
If I feel like this is too much out of our realm we will absolutely be hiring a professional.
MongoCT
10 years agolast modified: 9 years ago"Any tips on installing hexagon sheets? Should we use thin set mortar or tile adhesive?? Is one better than the other? Can we even use the adhesive on a floor? Is there a special technique or tools that would help us?"
Layout: Mark the floor. The following is simply a technique. You can do it any way you choose, or not do it at all. You'll probably have to fudge things to make them fit your space.
First square up the room to see if the walls are straight and square to one another, and to see if the tub is square to the right side wall. From your photo you started with full sheets of tile against the right side wall.
Tile sheets, grout lines between sheets, and gridding a floor:
Let's assume your sheets are all perfectly square, and the sheets are 11-7/8" wide from the outside edges of the tiles. Let's assume you're going to set them 1/8" apart. We're going to "grid your floor" in two-sheet increments.
A tile width plus a grout width is 11-7/8" plus 1/8", or 12". We're going to grid your floor in two unit increments, or 24" increments.
You've already squared your room, let's assume all went well.
Yup. Lots of "assuming" here.
So mark out two tile sheets plus two grout widths (24") from that right wall and draw a line from the tub to the doorway.
Measure 48" from that right wall and draw another line from the tub to the door, You'll now have two lines parallel to the right wall, one 24" from the wall and one 48" from the wall.
That'll straighten your layout lengthwise.
Then measure down from the tub in two sheet width increments (24") from the tub and draw horizontal lines, left-to-right, across the room. You should have five lines; 2', 4', 6', 8', and 10' from the tub.
Your floor should now be gridded in 24" square boxes. You'll have partial boxes against the left wall.
Now you're going to dry set your tile. No adhesive.
In our example we'll have four sheets of tile inside each grid box. The way I work with a grid is when I set my tiles inside each individual grid box, I set the sheets tight to the bottom line and tight to the left line. In our example, the other sheets in the box would get set 1/8" from each other, and that should result in the sheets being 1/8" from the right grid line and 1/8" from the top grid line.
Does that make sense? If not, I'll try to post a drawing. I did have something about gridding in a post way back, but it was about a herringbone layout. Here's that post.
Again, you don't have to grid. But it can help.
Regardless, dry set all of your full sheets on the floor. Make sure the gaps all look fine. If any look wacky, make sure the hex sheet itself is square. Some can get deformed in the box. If a sheet is wacky, you can sometimes rotate it and that can help with the gaps. If not, you might be able to use it against a wall with the wacky edge against the wall. You can also set the wacky sheets aside to be cut up for later use as fill-in sheets.
With the full sheets set, go back and cut and fill your partial sheets against the left wall. If you had any wacky deformed sheets, those can be cut and used as fill sheets.
With all the sheets dry set and the gaps all looking good, put a strip of painters tape on each sheet and number each sheet. Make sure you mark the orientation of the sheet as well so the sheets get reset exactly as they are dry set. No rotating allowed.
Adhesive. I usually use thinset over mastic. Since your tiles are not natural stone and you are not tiling a wet area, you could use mastic. In general it's easier to use than thinset. Your choice.
You probably already know this, but mastic comes ready-to-spread in resealable plastic tubs. Thinset comes in dry powder form in bags. Use a modified thinset, or modify it yourself by using unmodified and modifying it with an acrylic latex admix.
Trowel. The starting point for most installations is a 1/4" square notch. With small hex you'll probably find that trowel to be spreading too much thinset/mastic. I recommend using a 3/16ths "V" trowel as a starting point
Starting in the upper right grid in the room, spread adhesive within that grid. Spread it using the flat side of the trowel, then comb it out with the notched side of the trowel, with the trowel held at a 45 degree angle to the floor.
By combing it out with even pressure (with the trowel teeth touching the SLC) and with the trowel at an even angle, you'll leave a measured amount of adhesive on the floor. No thicker spots and thinner spots. Perfect depth everywhere.
Set your four sheets of tile within that grid:
1) The bottom left sheet is set touching the bottom grid line and the left grid line.
2) The bottom right sheet is touching the bottom grid line and gapped 1/8" from the bottom left sheet. That should gap it 1/8" from the right wall.
3) Top right sheet set tight to the left grid line and set 1/8" from the bottom left sheet. That should put it 1/8" away from the tub.
4) To right sheet set 1/8" from the top left sheet and 1/8" from the bottom right sheet. That should put it 1/8" from the tub and 1/8" from the right wall.After the four sheets are set in each grid and with the gaps looking good, you can pad the sheets down into the adhesive by tapping them vertically with a rubber grout float.
Once set and padded, run a strip of painters tape from one sheet to the next. That'll prevent them from floating.
If you have excessive adhesive squeezing out between the hex tiles, you can apply less adhesive by holding your trowel at a lower angle to the floor.
If you set a sheet and see a wacky hex, one that is crooked within the sheet, take a utility knife and cut the single hex free from the sheet. Pop it out with a screwdriver. You can then add a dab of adhesive to the back of the hex and reset it by hand, then tape it in place so it doesn't shift. When you reset it, be careful of how deeply you set it. You want it flush with its neighbors.
Then move on to the grid to the left or right, depending on which way you prefer to work. Repeat. Work your way out of the room, grid-by-grid.
Or do it differently. No worries. I'll be offline for a few days, good luck!
scerrir
Original Author10 years agolast modified: 9 years agoHi Mongoct!
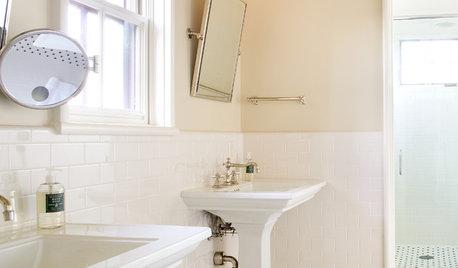
After reading your posts and expert advice...I made the executive decision that it is out of our expertise and I didn't want to make yet another mistake. We ended up finding an amazing contractor and he laid on a Friday and grouted it on the Saturday!
I am in love with it now!!! Very happy with how it turned out.
I wanted to say thank you so much for your help in my journey! You are such a kind person, giving your time and advice for free. It was all very much appreciated and gave us a lot of insight!
Rhea
enduring
10 years agolast modified: 9 years agoThat is beautiful!!! And you are so right about Mongoct, he is a real treasure. You be sure to keep us posted on the rest of this room, please. I love it!
raehelen
10 years agolast modified: 9 years agoBet you're pleased with your decision! So, what do you think was the cause of the problem the first time? Was it using Ditra with those small tiles?
I'm glad it turned out finally, and good luck finishing it off!

likewhatyoudo
10 years agolast modified: 9 years agoLooks very nice! What tile are you using on the floor and in the tub surround. I really like the larger format subway tiles with the floor. Look forward to seeing the finished room.
Lisa Hearne
8 years agoI have vertical seams running the width of my bathroom. Same issue…seams where the mesh sheets were placed together. Can I do what mongoct suggested (pop off one or two tiles and spread out reducing the grout line seam) if the tile has already been grouted?
 PRO
PROCabot & Rowe
8 years agoCertainly can. But it is tedious, PITA work. Well worth the effort once completed though.
Lisa Hearne
8 years agoThanks Cabot & Rowe. My tile job..done by a professional. Doesn't look right, does it? I kind of want to rip the whole thing out. Now that you see pictures, do you still think I can move the tiles around where you see the seams to change up the grout widths? Thanks again.
- PRO
Cabot & Rowe
8 years agoThe work should be done by that same professional who installed them. We take great pains not to have 'sheet marks' when setting mosaics. Staggering the sheets helps. From here it seems you'll be removing a lot of tiles which is much easier than removing a few. I'd be inclined to take out one tile on each side of the lines.
Lisa Hearne
8 years agoI've been told by a tile retailer that if we pop out a few of the tiles (or as you suggest…take one tile out on each side of the lines), that we shouldn't grout back over any of the old grout. Is that true? They were saying we should grout only around the new tile. Furthermore, they said even when mixing "bright white" grout, we might get a slight color variation in the grout itself. Advice? Thanks again for helping.
Lisa Hearne
8 years agoOne other thing, the tile installer says that along each interlocking side, the white tile is just a bit darker than other tiles and that is forming a shadow line. He claims it isn't the installation. Anyone ever hear of that? I can in fact see a bit of a shadow and I know that white hexagon tile can have slight color variations when looked at very very closely. This isn't usually seen when the tile is laid. It's seen once the grout is in place and highlights the color variations.
- PRO
Cabot & Rowe
8 years ago1- You can't grout over old cement based grout. Do you know the specific grout used? Was it a dry powder you mix with water ? If yes, you cannot grout over grout. You'll have to dig out at least half the depth of the old grout to grout in that area. If you used one of the newer single component grouts such as Fusion, Plasma or Flexcolor, you can grout over grout but they are the only exceptions to the rule.
2- Never heard of such a thing. Do you have any spare sheets lying around? Take one to an artist with a sharp eye for color and ask if you doubt yourself.


williamsem