Shop Products
Houzz Logo Print
thetews

tile experts, others, please weigh in / give advice

thetews
16 years ago

Ok - Here are my plans, followed by my questions. I hope the tile experts, and anyone else with opinions will weigh in.

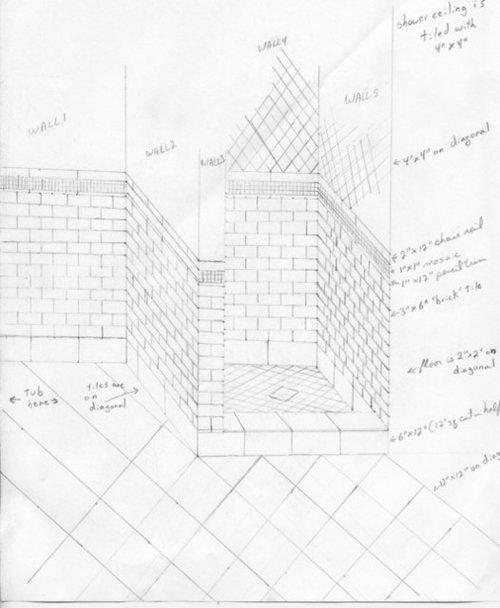
Overview: Master bath is 8'x9'. There is a door (pocket) in the middle of one 8' wall. On the right is the shower (will be ~3'x 3') and past that is where the 5' clawfoot tub will be. There will be a window (not shown in drawing) above the tub. On the left of the door there will be two free standing vanities (34" wide each) and then the toilet.

Tile choices - we've ordered tumbled limestone in a pattern/color called Philadelphia - it's beautiful.

Below you can see my (clumsy) rendition of what my walls/floors will look like. Basically the tile goes up about 49" on the entire bathroom. The same pattern including trim continues into the shower, and above the trim there is more tile in a different size/pattern.

Bathroom tile:

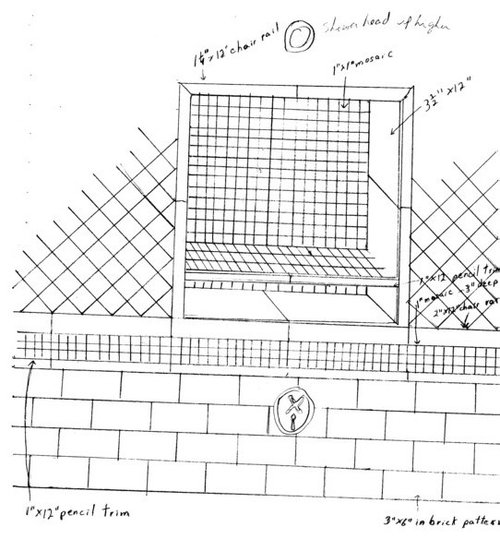
On the shower wall on the opposite side of wall 2 is where the shower faucet will be, above which there is a niche, and above that is the shower head. (thanks Bill for your encouragement of that design) Here is my rendition of it:

Ok, so my questions:

1- Wall 3 will be ~5.25" deep (a 2x4, 1/2" hardiboard, 1/2" drywall, and 2 depths of 3/8" tile). Is how I'm planning on laying the "brick" 3"x6" tile ok?

2- If it isn't a good idea, what would you suggest?

3- If it is a good idea, what would you do on the corners? Miter each piece and the pieces on the adjoining walls (wall 2 and the opposite side of wall 2)?

4- If not miter the corners, then which wall should overlap the edge of the other wall? Or should they alternate overlapping?

5- I'm assuming that I should definitely miter the corners of the "pencil trim" which is rounded and deeper than the other tile, and also the chair rail which is deeper than the other tile, right?

6 - Anything special I should know about mitering the corners of the tile?

7 - Ok, on layout - obviously I will probably not be lucky enough to have wall sizes where I can continue running the brick bond and not end up with little pieces at some of the corners. How do you guys handle this type of situation to make the tiles look nice everywhere?

8 - Since my shower floor will be slightly higher than the rest of the floor, my 6"x12" bottom row will actually be shorter than 6" high; that's normal right?

9 - Ok, this is a tricky one in my mind. I have to build the niche before I begin tiling because I am using Kerdi in the shower. As you can see, it begins at the top of the chair rail. How do I figure how high to put it? I can add up the height of all the tiles, and add in grout size, but how accurate will that be? Should I err on the side of being a little lower, and then having shorter than 6" high bottom row of tile all around the bath?

10 - and continuing on that theme - I'm guessing that I begin by tiling the shower floor and the rest of the bathrom floor, then the niche, and then putting the border pieces under it and then all around the shower, then do the tile below down to close to 5" (or so - so that continuing out of the shower is 6" or less), then measure and cut the bottom row (the 6"x12") to the right height, and then continue around to the other walls outside of the shower. Does that seem right? (Assuming I'm making sense)

11 - We'll be putting in a shower door and a glass panel - probably 12" of panel and 24" of door - I'm not sure yet of the thickness, but I assume I need to know that before tiling and then cut make a notch (making the tile 3/8" thick) where the glass will be) and make a reveal (I think that's the right word) on either side of the notch. Does this sound right?

12 - I'll probably be putting up standard colonial trim around the window and pocket door because that's what we have in the rest of the house. Again I assume I should cut a reveal on the trim tiles, right? How should I cut/abut the field tile around the window trim?

13 - My tub and sink faucets will be jutting out of the field tile; what do I use to cut holes into the tiles?

14 - I almost posted and then remembered one more question - on the floor I have 12"x12" on the diagonal. In a rectangle room that could always be made to look "even" on all walls. But since I have the outside corner at the end of the shower, what do I do? I've drawn it so that the corners of the diagonal tile meet the corner of the shower wall. But what if that causes really little cuts at the other walls? Where should I take the "hit" on small pieces, or is there some way to avoid them completely that I'm not seeing?

Ok, that's probably way more than you expected to be asked, but I would really appreciate any help you can give. I've tiled several floors, a bathtub surround, and my kitchen counter top and backsplash. The kitchen tiles are tumbled marble, and they look really good; the rest of the tile jobs were ceramic or porcelain and all turned out pretty good.

Thanks again,

Alice

Comments (6)

  • codnuggets
    16 years ago
    last modified: 9 years ago

    Oh boy, I'll be watching this thread. First, I love the plan you have put together. If you execute this like you intend to, it's going to look awesome! Second, I am facing some of the same challenges in my bath. I've spent an ungodly number of hours measuring, sketching, calculating, and laying out everything to try and make sure it all lines up. There are so many factors to consider, and Bill, Mongo, and others will wave lots of good info for you. I'd love to answer a few of your questions, but I'm going to leave it to the professionals. They would probably have to follow me with corrections anyway.

    Be sure and keep us posted on your progress.

    Joe

  • weedyacres
    16 years ago
    last modified: 9 years ago

    First of all, I have to say I'm very impressed at the detail to which you've thought all this out. It took me a while to read through it, referring back to the pictures, but you really have analyzed this 6 ways from Sunday.

    My comments:
    1/2: Don't forget the thickness of the thinset too. But you should still be 3/4/5/6: I'd miter the pencil rail and the subway tile. No great tips (I've not done many), just make sure your tile saw accommodates miters.
    7: Do a pre-layout so you can see if there will be any really bad stuff, like need for 1/2" tile, and try to rearrange to avoid it. Make the most visible parts look the best, and hide the short stuff in harder-to-see spots.
    8: Yes, most important to make the top of those base tiles align.
    9/10: The one problem with just shortening all the base tiles (if needed) would be that it looks like you want the lowest row of subway tiles to start above the shower curb. So that's going to be at a fixed height. I would use the small mosaics as the "flex" filler, adding/deleting a row if needed. And for the fine-tune adjusting, rather than having the niche perfectly integrated at the exact width of the chair rail, plan so the bottom is above the chair rail, and have the border tile be a cut-to-fit. Then start at the floor, tile up to the niche, adjust the mosaics as needed for the chair rail to be at the desired height. (BTW, that's quite an impressive integrated design!)
    11: Dunno. We've hired our glass doors installed.
    12: I'd put the door/window trim on first, then butt the tiles right into them. Caulk the crack.
    13: They make special tile drill bits that cut holes.
    14: All you can do is lay out a couple rows and if you get small cuts, shift everything a few inches and the small cuts disappear.

    Good luck, and make sure to post photos of your progress!

  • bill_vincent
    16 years ago
    last modified: 9 years ago

    Clumsy, my patuty!! WOW!! Where do you live??? Can I come out and tile your bathroom??? :-)

    In all seriousness, that's going to be one sweet masterpiece to put together!

    Before I get to your questions, though I do see one problem. It's going to be tough to run the chair rail through the shower and have any kind of glass enclosure. Not impossible, but tough. You would have to work together with your glass guy to figure out EXACTLY where the glass would go, so you could leave notches in the chair rail. I can guarantee you-- they're not going to notch the glass for you. :-)

    Now, on to the questions:

    #1-6) What you have drawn is excellent. With reference to the subway tile, no, the corner pieces do not need to be mitered. What you can do is cut the pieces, but then turn the cut edge into the field, and use the "factory" edge as the bullnose. Now, I said they don't NEED to be mitered. However, if you'd PREFER to miter them, there's no reason why you couldn't. It's not like it's ceramic where you'd have to worry about a sharp edge. As for the chair rail and liner, you're right. Those WOULD have to be mitered. The biggest tip I could give you about mitering the chair rail would be to have a piece of 2x4 handy with a 45 degree mitered end on it. You can place the mitered side of the 2x4 against the wet saw tray table's edge, and that'll give you the correct angle, and the thickness of the 2x4 will give you something to make sure you're standing the chair rail up straight while you cut it.

    If you decide that you want to miter all the outside corner tiles, the only advice I can give you is leave a little "meat" on the edge. You don't want to take the miter all the way to the face of the tile. If you do, you'll end up with an extremely ragged edge. Leave 1/16" of meat or so on the front edge. The finished miter will still look just as tight, and it'll be 100% stronger.

    #7) Don't worry about continuing the cuts. Atleast not on the subway tiles. For the most part, the ONLY time you really need to worry about it is when you use a diagonal layout. With running bond (the brick joint pattern), there's no need to continue it. Take each wall individually. Now, the best thing is to center the walls. However, sometimes that gives you small pieces on each end. With a square layout, moving the layout over half a tile, so the tile is centered instead of the grout joint, the problem is solved. With running bond, if you move it over half a tile, it puts you right back where you started!! So how do you move the layout over and still keep it centered? Move it over a QUARTER of a tile (1 1/2"). What this does is it'll give you equal, but alternating cuts. Lay it out on paper and try it-- You'll see what I mean.

    #8) Yes, that's normal.

    #9) Ya had to give me a hard one!! :-) You're right-- this CAN be tricky. But you're dead on the right track. You need to figure out your coursing (each course is one tile and one grout joint). Lets say yout tile is exactly 3" high, and you're using a 1/4" grout joint. Going by your drawing, I come up with a height of 51 1/2" high. You show a 6x12 piece on the bottomwith the 1/4" joint, that's 6 1/4". Next is 12 courses of subway tile. That's 39 inches (with 12- 1/4" joints). Then the pencil liner, which, if it were me, would get an 1/8" joint (to match the joint in the 3 rows of mosaics), so that's another 1 1/8", and then I'm assuming the chair rail is 2", plus another 1/8" joint, 2 1/8".

    Just a side note-- this would be another reason for NOT using the chair rail, unless you have the shelf come out over the top of the chair rail. With the other three sides, you can either cap the edges of the niche pieces, or you can have the niche pieces cap the edges of the wall. But the shelf MUST come over the edge of the wall tile. You want any water running down the face of the tile, rather than going into the grout joint. Alot of times, I'll even use a piece of granite tile, and round it out PAST the face of the tile, so that it doesn't even come doen the face of the tile, but actually gives a drip edge.

    Okay-- back to your niche. Just for the sake of argument, lets say the height is 51 1/2". You want to take into account the thickness of the cement board, as well as the kerdi (figure 5/8"). I would also, as you surmised, give it extra as a "fudge" factor . That way if you need the play, it's there, and if you don't, you can always fill it in with thinset. If it were up to me, and the chair rail was definitely going to stay, I'd set the framing at 50 1/2". The only question is, are you going to set your levels off the finished floor, or off the subfloor? Personally, I'd set it off the subfloor, but when I actually set the tile, set it over the finished floor, cutting it in. That way, if the floor's out of level at all, you'll never see it. Either way, it's up to you. The point is, I'd set the bottom of the niche framing an inch below what you expect the actual coursing to be.

    #10) That's the way it LOOKS when it's done. :-) You start with a full course above by nailing a piece of wood, and tiling off of that, and then removing it afterward and cutting in the bottom. As for the Kerdi in the shower, you can patch the holes afterward with Kerdi-Fix. You want to wait as long as possible to tile the shower and bathroom floors. You never want to be working over finished work any more than absolutely necessary.

    #11) I already addressed this above.

    #12) Install your wood trim first and tile to it.

    #13) Diamond hole saw. You can check some of the online tile tool supply sites. if you have a hard time locating them, let me know, and I'll see what I can do to find em for you.

    #14) this is where we get back to the thing about going from center to 1/4 and 3/4 tiles to get back to center. It works with diagonal layout, too. One other thing to think about, and this would work as a nice design feature, too-- from the chair rail up, turn one row of subway tiles on end, running them lengthwise up the sides of your diagonal tiles as a border.


    WOW!! This reminds me of Rodney Dangerfields's movie Back To School-- to paraphrase right after he finishes the oral exam and says "I feel like I just gave birth!! To an apprentice!!"

  • bill_vincent
    16 years ago
    last modified: 9 years ago

    One other thing, concerning the chair rail and glass-- if you DO decide to keep the chair rail thru the shower, you're going to HAVE to have fixed glass panels coming off both walls. You will have no choice in this matter.

  • thetews
    Original Author
    16 years ago
    last modified: 9 years ago

    Hi again. I went to bed after posting last night and just now had a chance to get back online.

    Joe, Weedy, and Bill, thank you for the positive comments about my design.

    Weedy and Bill, thanks so much for the all of the answers and advice. I feel MUCH more confident about being able to decently carry off my plans correctly and nicely.
    Before I begin tiling I'm going to print this thread out and have it handy as I begin and as I reach the different critical points.

    Bill, I had not considered that the shelf needed to come over the wall tile; I had it the opposite way. Do you know if I can likely get granite tile 20" wide? Especially if I only need one tile? And what do I need to do to the exxposed edge to made it look nice?

    Yes, I should definitely run one course of subway tile, on end, at the edge of the diagonal tile above the chair rail; thanks for the advice on this.

    Again, thanks to both of you for taking the time to review my design and questions and putting so much into the answers.

    I do have a few more questions, but never fear - they are not as detailed or complicated as the earlier ones.

    15 - Through the doorway of my bathroom is a carpeted floor - which may one day have hardwood. Should I look for a nice stone threshold for the doorway? I think I noticed some at the tile store. Or is there a better thing to do?

    16 - One shower wall is on an exterior wall. I think I read here that if we're using Kerdi on an exterior wall to NOT have a separate vapor barrier. Is this right? So I should put unfaced insulation in the wall with no vapor barrier?

    Thanks again! You guys are great!

  • bill_vincent
    16 years ago
    last modified: 9 years ago

    Bill, I had not considered that the shelf needed to come over the wall tile; I had it the opposite way. Do you know if I can likely get granite tile 20" wide? Especially if I only need one tile? And what do I need to do to the exxposed edge to made it look nice?

    What you might do is go to a stone shop and see if they have any remnants that would look good with either your tile, or the overall color scheme of the room, and if they do, you can have them cut it to size, and even put a finish on the outside edge, whether that be bullnose, or even an ogee, or whatever. Going to a stone shop, and using a 2 cm slab piece, you could get even more decorative than I do. Just measure the depth of the nich, including coming out about a 1/2" past the finish directly underneath, whether that be the chair rail or the tile.

    #15) A stone threshold is ALWAYS a nice touch, as far as I'm concerned. Puls, if installed properly, it even has a utilitarian purpose-- in case of light flooding-- from the tub or toilet overflow-- it'll act as a dam at the door to keep the floor finishes outside the door from being ruined. You might even see, when you go for the niche piece, if they could make a threshold out of the same stone!

    #16) You could either do that, or just cut a bunch of slits into the facing. That way, you still get some protection, but at the same time you don't create a moisture "sandwich".

Sponsored
Kitchen Kraft
Average rating: 4.8 out of 5 stars39 Reviews
Ohio's Kitchen Design Showroom |11x Best of Houzz 2014 - 2022