


Insulating a basement
jimbo22s
15 years ago
Sort by:Oldest
Comments (27)
Related Stories
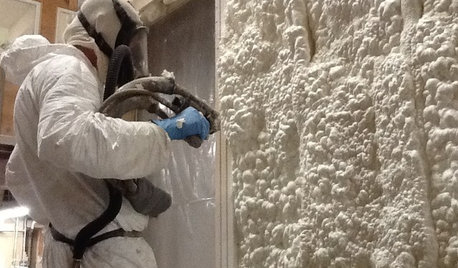
MATERIALSInsulation Basics: What to Know About Spray Foam
Learn what exactly spray foam is, the pros and cons of using it and why you shouldn’t mess around with installation
Full Story
REMODELING GUIDESCool Your House (and Costs) With the Right Insulation
Insulation offers one of the best paybacks on your investment in your house. Here are some types to discuss with your contractor
Full Story
GREEN BUILDINGInsulation Basics: Heat, R-Value and the Building Envelope
Learn how heat moves through a home and the materials that can stop it, to make sure your insulation is as effective as you think
Full Story
WINDOW TREATMENTSEasy Green: 9 Low-Cost Ways to Insulate Windows and Doors
Block drafts to boost both warmth and energy savings with these inexpensive but effective insulating strategies
Full Story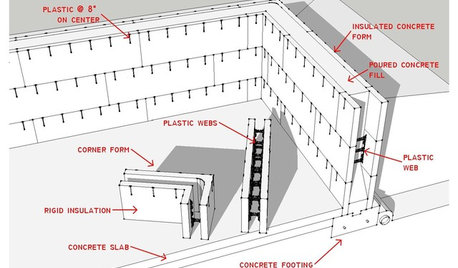
KNOW YOUR HOUSEKnow Your House: The Basics of Insulated Concrete Form Construction
Get peace and quiet inside and energy efficiency all around with this heavy-duty alternative to wood-frame construction
Full Story
MONTHLY HOME CHECKLISTSSeptember Checklist for a Smooth-Running Home
Get ready to get cozy at home with snuggly blankets, well-stocked firewood, added insulation and more
Full Story
ARCHITECTUREHouzz Tour: High Efficiency for a Modern Riverside Cabin
With an insulating green roof, savvy material use and a smart design, this home in the woods wastes not in a beautiful way
Full StoryBASEMENTSBasement of the Week: Fun for All Ages in Connecticut
Crafts, wine, billiards and ... soccer? Yup, this tricked-out family basement has room for all that and more
Full Story
BASEMENTSDesign Workshop: Is It Time to Let Basements Become Extinct?
Costly and often unnecessary, basements may become obsolete — if they aren’t already. Here are responses to every reason to keep them around
Full Story
REMODELING GUIDES10 Tips for Renovating Your Basement
A professional contractor shares her tips on what to consider before you commit to a basement remodel
Full StoryMore Discussions


worthy
jimbo22sOriginal Author
Related Professionals
Goldenrod General Contractors · Perrysburg General Contractors · Towson General Contractors · University Park General Contractors · View Park-Windsor Hills General Contractors · Wallington General Contractors · Birmingham Interior Designers & Decorators · Fountain Hills Interior Designers & Decorators · San Angelo Architects & Building Designers · South Elgin Architects & Building Designers · Wauconda Architects & Building Designers · Lincolnia Flooring Contractors · Monrovia Flooring Contractors · Mukilteo Flooring Contractors · St. Louis Flooring Contractorshomebound
worthy
homebound
jimbo22sOriginal Author
homebound
worthy
jimbo22sOriginal Author
worthy
worthy
jimbo22sOriginal Author
worthy
jimbo22sOriginal Author
jimbo22sOriginal Author
worthy
jimbo22sOriginal Author
worthy
jimbo22sOriginal Author
andrelaplume2
worthy
jimbo22sOriginal Author
worthy
jimbo22sOriginal Author
worthy
dave-maryland
worthy