Shop Products
Houzz Logo Print
billy_g_gw

Culinarian 8K Simmer Burner Retrofit

billy_g
12 years ago

Today I converted one of the burners on my CC to an 8K simmer burner. It works really well and it�s great to have the option of a very low simmer. At simmer I can keep my hand just above the grate without having to pull it away.

This post will show you how to convert yours if you want to. If I decide to change back to the regular burner I�ll order a new one from Capital and swap out the gas orifice and readjust the air shutter and simmer. It�s that easy.

I used a #56 gas orifice because that is what was available. You could use a #55 and get a little more gas flow but it�s not a big difference.

Before I get into the details I have to say I do not understand why Capital does not at least offer this burner as an OPTION to consumers. What do they have to lose � and they might gain more customers who want a low simmer and select a different range. The whole idea of a simmer plate "fix" is really silly to me and it borders on dumb. With a simmer burner you can adjust the heat up or down immediately. With a simmer plate you would have to adjust and wait, adjust and wait, adjust and wait. A simmer burner gives you the high performance control that cooks want � and people who buy the CC buy it because they like to cook. I just don�t get the simmer plate idea. (The simmer plate approach raises this analogy -- if you had a high performance auto that made too much noise because it idled too high, a simmer plate is like the car company giving you earplugs to deal with the high idle instead of directly addressing the idle issue.)

The simmer burner retrofit involves plugging up the two outer rings of the burner, changing the gas orifice (I used a #56), adjusting the gas shutter, and re-adjusting the simmer. Done.

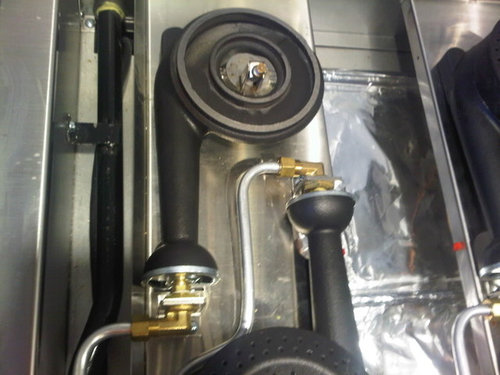
Photos are below. My cooktop is a 48 inch with grill. I have 6 burners and I turned the back left burner into an 8K simmer burner.

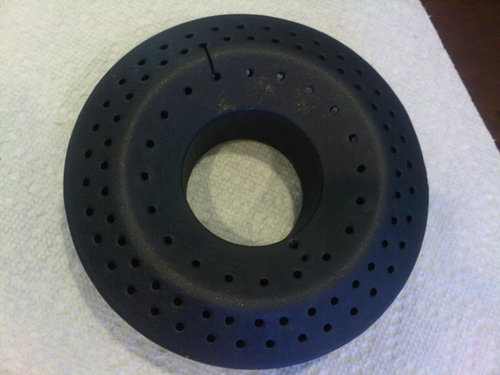
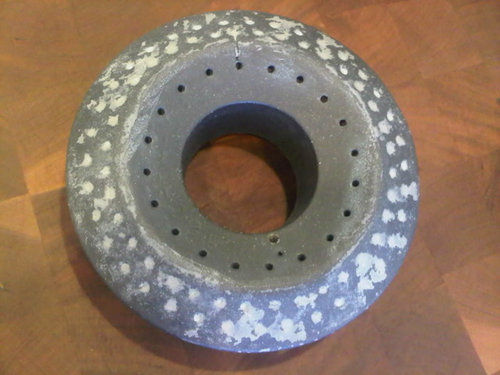
This is the burner cap removed and ready for the operation:

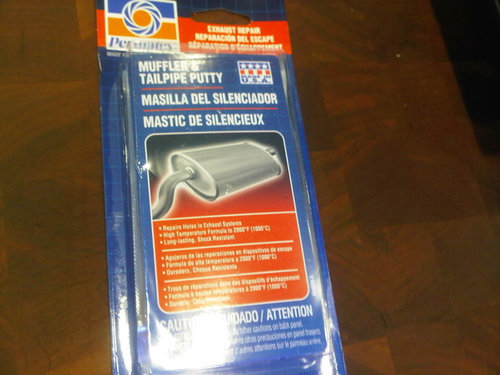
This is the muffler repair putty that I used to plug the holes in the outer two rings It is composed mostly of silicates and it is good to 2000 degrees, which a burner will never approach.

This is the putty spread on the outer two rings and pressed in with a putty knife. Be careful not to get any putty in the inner ring or ignitor holes.

Before the putty hardened I scraped off the excess with a clean putty knife and scrubbed it with a green 3M pad. Some of the excess putty bonded to imperfections in the cast iron and would not come off. I waited about 15-20 minutes to scrape but probably could have done it after 5 or 10 minutes.

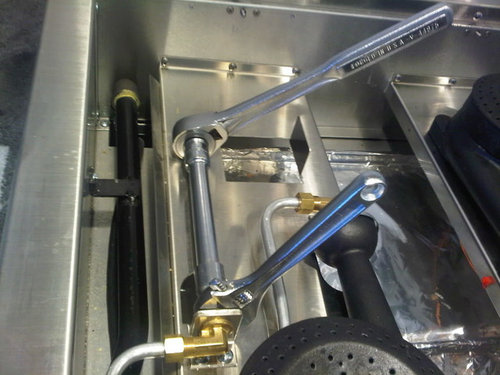
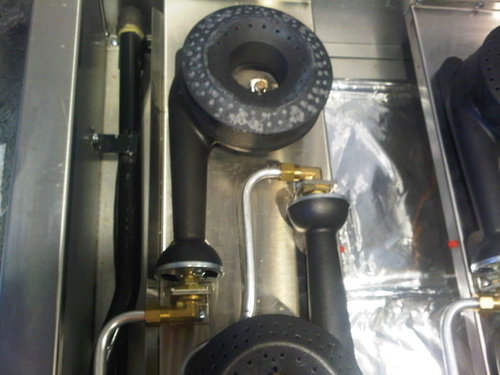
I removed the existing gas orifice from the CC as shown below. The crescent wrench keeps the gas delivery assembly from twisting and the socket wrench and ratchet loosens the gas orifice. I used a 1/2 inch deep socket on the gas orifice and turned it very carefully because you easily could cause damage with a large socket wrench.

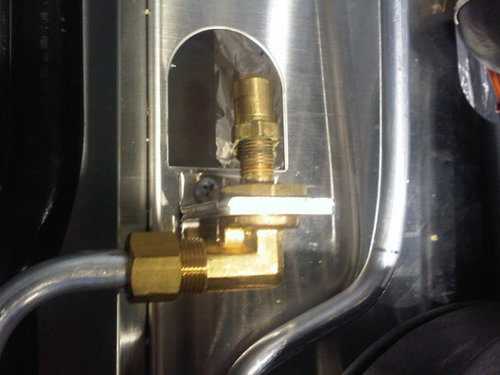
This shows the original gas orifice almost off.

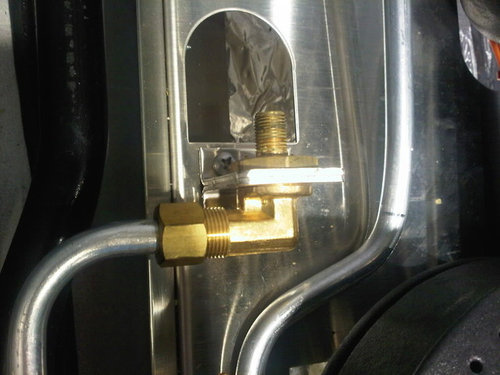
This shows the gas orifice off.

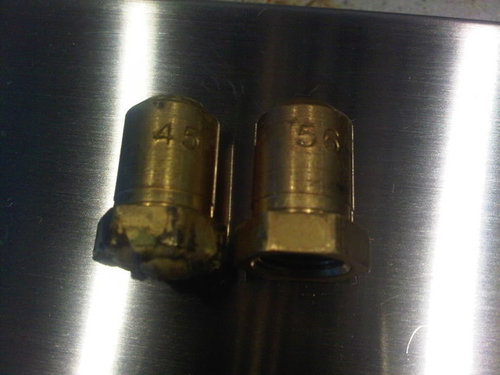
This shows the original gas orifice (#45) next to the new gas orifice (#56) for the simmer burner.

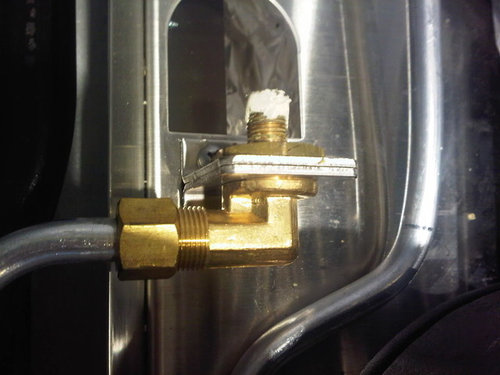
This shows the pipe dope on the cleaned threads prior to installing the new orifice. Make sure you get good coverage on the threads and no pipe dope on the inside of the pipe or orifice. You should not use Teflon tape on this gas connection.

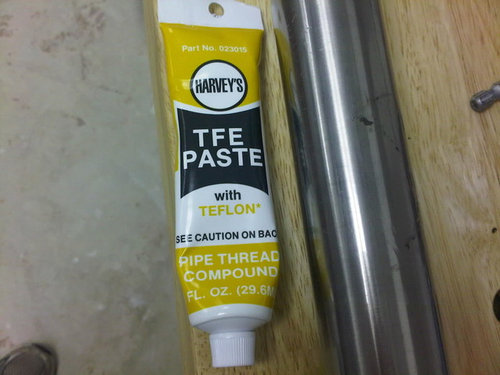
This is what a tube of the pipe dope (thread compound) looks like.

This is the new #56 gas orifice installed.

This is the gas burner assembly mounted on the new orifice.

With the burner cap in place:

This shows the air shutter with the burner on high. Note that the air shutter is almost closed. On the 23K burners the air shutter is almost all the way open.

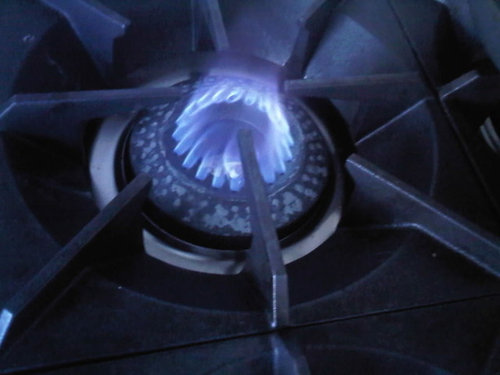
This shows the simmer burner on HIGH.

This shows the simmer burner on the lowest SIMMER. You can hold your hand just over the top of the grate without it burning.

Here�s a side photo of the lowest SIMMER. Sweet!!! I could pre-melt butter with this thing.

As for the color I think everything will darken over time, or I could use some stove black to color the burner cap black.

Billy
Comments (71)

  • PeterH2
    12 years ago
    last modified: 9 years ago

    The idea is to measure the temperature in an accurate and repeatable fashion; "real-world cooking" is far too subjective. So, we want a medium that convects and conducts well so the temperature is nice and even. Condensed soup is inferior to water in both respects. 10oz is also too much; some of the super-low temperature requirements that have been discussed are for much smaller amounts, and the smaller the amount, the higher the temperature is likely to be.

    I think the ideal test would be a 6" diameter cast iron disc, measured with an IR thermometer. But we can't realistically expect everyone to have that.

  • chopperace
    12 years ago
    last modified: 9 years ago

    God I hope Capital offeres a retrofit kit like this!

  • foodonastump
    12 years ago
    last modified: 9 years ago

    I disagree, Peter. To me, "real-world cooking" means some folks remember we're cooking eggs in a kitchen, not incubating them in a laboratory. At what point do the controls on these tests become a bit ridiculous? A few degrees +/- due do different pan size, construction, ambient temperature, etc. doesn't make a lick of difference "IRL".

    You don't need a scale, a thermometer or any specialized equipment to objectively answer relevant questions like "Can you take a pot in the neighborhood of one quart size and keep single serving of rice - say 1/2 cup rice and a cup of water - at a low simmer for 20 minutes at the lowest setting?" If your answer is no and someone else's answer is yes, then their cooktop low is performing better than yours. And it's not because they're cooking in a 60 deg kitchen with Calphalon and you're in a 68 deg kitchen with All-Clad.

    If someone can hold their hand over the burner indefinitely and you can't do the same for more than a few seconds, your burner is running hotter. Period. Regardless of the individuals' tolerances for pain.

    It's pretty simple, as long as you allow it to be simple. Yes, you need to establish whether you're simmering three quarts of chicken stock or a cup of rice, but the variables don't need to be precisely controlled and measured in order to make relevant comparisons.

  • deeageaux
    12 years ago
    last modified: 9 years ago

    I think the ideal test would be a 6" diameter cast iron disc, measured with an IR thermometer. But we can't realistically expect everyone to have that.

    That sounds a lot like an objective "book" definition which I prefer but it seems people were calling for a "real world" definition.

    Condensed soup is inferior to water in both respects.

    I don't have a college degree in science but that sounds counter-intuitive.

    10oz is also too much

    Really? A small can of Cambell's soup is restaurant quantitiy now? Are we preparing meals for Lilliputians?

  • angie_diy
    12 years ago
    last modified: 9 years ago

    Great job, billy

  • billy_g
    Original Author
    12 years ago
    last modified: 9 years ago

    All, I don't need to measure the temp on this burner. It powers down really low. Look at the last photo in the first post. There's no need for lab testing here.

    As a further upgrade I like the thought of letting the middle ring of burner ports be the simmer burner instead of concentrating the heat in the inner ring, but I don't know if this "concentration" is a problem at all. In any event the heat could be spread with a simmer plate.

    Sometimes you want to use a simmer to melt butter or heat up a sauce in a small-bottom pot. In this case the narrow inner ring is fine. Other times you want to simmer a big pot of stew and in that case a wider simmer would be good to avoid concentrated heating, and a thick-bottomed or quality pot or a simmer plate will spread the heat.

    I'm in Rome, enjoying the good food here. :-)

    Billy

  • breezygirl
    12 years ago
    last modified: 9 years ago

    You have the ability to simmer at home.

    AND

    You are enjoying Rome??

    Color me doubly green. :)

  • jscout
    12 years ago
    last modified: 9 years ago

    Billy, did you say Rome? As in Italy? If can find the time, seek out Santo Padre on via Collina. It's not too far from the US Embassy. My favorite restaurant in Rome. No menus! They serve whatever they have cooking up. You sit down and the food starts flowing, from the antipasti through dessert. Regulars who make reservations have their favorite antipasti on the table waiting for them. We just walked in, so we got some of everything. It wasn't expensive either.

  • mojavean
    12 years ago
    last modified: 9 years ago

    If you decide to do a mod, it should be easy to drill out the blocked middle ring and apply the muffler putty to the inner ring, minus the cross-ring burner port pathway that connects the ignitor electrode, of course.

    Cool science project, of course, but I am not sure you will really need to do anything, Billy. You have tons of heat available on all your other burners; that one looks like it will hold about anything you want without burning.

    I think we have to say that you have successfully circumcised your Culinarian.

  • jscout
    12 years ago
    last modified: 9 years ago

    @Breezy - Has Capital helped you lower your simmer yet?

  • Caddidaddy55
    12 years ago
    last modified: 9 years ago

    Decided to do the the simmer test last night 2 cans broccoli cheese soup & 2 cans milk in 2 qt thick bottomed 8.5" dia sauce pan heated to 180 deg. then turned down to simmer, pan cooled off to 144 deg. but as gas pressure must have varied fluctuated up to 170 deg. only stirred 3 times in 1.5 hrs. Whoever said Broccoli cheese soup wasn't a good test was right as any cream based soup should be stirred fairly regularly, but I resisted. I then placed the pot on a different burner with the simmer plate like the one Trevor used and it never went above 129 deg. I think with a little more fiddeling with the air shutter I may be able to get even a more consistant simmer without any modification to the burner. Just the same, good job Billy, thanks for shareing.

  • tubeman
    12 years ago
    last modified: 9 years ago

    What stove were you simmering on? Did you modify the burner?

  • Caddidaddy55
    12 years ago
    last modified: 9 years ago

    READ THE POST "without any modification to the burner" obviously a CC that's what we are talking about.

  • jscout
    12 years ago
    last modified: 9 years ago

    Aw, come on, Caddi. Tubeman is a fellow CC sibling. Cut them some slack. We're all in the same boat.

  • tubeman
    12 years ago
    last modified: 9 years ago

    With all due respect I did not read your post carefully enough. Thanks for the reply and clarification.

  • IceMan965
    12 years ago
    last modified: 9 years ago

    Caddy: "�but as gas pressure must have varied fluctuated up to 170 deg."

    Can you tell me why your think the gas pressure may have fluctuated? In my area NG is delivered into the house at 6" �WC � 8" WC (Post meter/regulator) and the CC Range has an internal pressure regulator that I believe is 5" WC (My regulator is hard to read), therefore the pressure going into the gas control value should be pretty constant. Also the specifications for the BS shows it too uses a 5" WC internal regulator.

  • Caddidaddy55
    12 years ago
    last modified: 9 years ago

    sorry tubeman this long running script message I got today at work and at home is really slowing down gardweb and it's really a pain. iceman, I am on LP the tank is at 60 percent full, but outside temp does affect the pressure, as it gets cooler the flame gets hotter, kind of like a car when it is cold outside. As the regulator only regulates max pressuer and the one on the range is not adjustable, maybe I need to get the LP company to come out and adjust the pressure at the tank or where it comes into the house. Also don't use alt charecters in a post as gardenweb does not seem to be able to handle it well. I don't know what your message looks like to you but to me it says caddy: "(upside down question mark which I can't reproduce)1/2but as, and then later, "at 6"1(with a sideways colon above it)(upside down question mark)WC(1 with a sideways colon above it)(upside down question mark)1/2 8"WC. Unless you have a MAC, which is no doubt better at interpeting this than my Dell XPS on Wondows 7, it does not read well, Just like when you use " or ' in the subject line. Notice how many people are looking for 48 foot fridges or 60 foot ranges,but when you read the text it looks correct. Anyhow I adjusted the air shutters more closed and used the water in the same pot the results 159 deg without the simmer plate, 138 with it, so that is not better, looks like I need to open them up a little. I did mention welding up some ports and changing the orifice to DW, but that was met with "the Look" you know the one the hardware store owner's wife gave him on the old "Home Improvment" show. Come on, you know we all watched it "More power argh argh argh"

  • billy_g
    Original Author
    12 years ago
    last modified: 9 years ago

    Dang, jscout, I am staying near the U.S. Embassy and I walked around looking for a place to eat. I was happy with the place I stopped (bruschetta w/ tomatoes and mozzarella, gnochhi with gorgonzola (too heavy), saltimboca, and creme caramel, and sambucca, and white and red...), but your place sounds fabulous!! Too bad, that would have been cool.

    Julius could cook (and fiddle)!

  • billy_g
    Original Author
    12 years ago
    last modified: 9 years ago

    A few meal pics:

  • stooxie
    12 years ago
    last modified: 9 years ago

    Caddidaddy, I believe Iceman is correct. The regulator on your LP tank, and that in your range, is to maintain constant pressure on the outlet side. The supply side should always have higher pressure so the regulator can continue to supply the rated amount as the pressure is released (i.e. valved opened) on the outlet side.

    The regulator on the outlet side of my NG gas meter takes 2PSI (54" WC) and steps it down to the standard 1/4 pound 7" WC. If I turn on my fireplace, range and the heat comes on the regulator allows more flow to maintain the 1/4 pound. Given that NG and LP operate similarly I would have to imagine this is true for you as well.

    From wikipedia:

    "All propane and LP Gas applications require the use of a regulator. Because pressures in propane tanks can fluctuate significantly, regulators must be present to deliver a steady flow pressure to downstream appliances. These regulators normally compensate for tank pressures between 30 - 200psig and commonly deliver 11 inches water column (0.4 psig) for residential applications and 35 inches of water column (1.3 psig) for industrial applications. Propane regulators differ in size and shape, delivery pressure and adjust-ability but are uniform in their purpose to deliver a constant outlet pressure for downstream requirements. As is the case in all regulators, outlet pressure is lower than inlet pressure."

    -Stooxie

  • Caddidaddy55
    12 years ago
    last modified: 9 years ago

    stooxie I agree, i was just thinking that the tank reg was set too low, lower than the one on the range.

  • breezygirl
    12 years ago
    last modified: 9 years ago

    Jscout--No. My rangetop has yet to see a tinkering tech. I did speak, finally, with Joey at Capital yesterday. I'm trying to get a post together with an update.

  • smshelton
    12 years ago
    last modified: 9 years ago

    Can someone tell me where I can buy the #56 orifice to do this retrofit?

  • beefstew01
    12 years ago
    last modified: 9 years ago

    Folks, please please be careful making adjustments to the burners of your ranges. Unless you understand exactly what you are doing and are confident I would recommend not doing it at all.

    Without the proper equipment (combustion analyzer) you could sicken yourself (or worse) messing around with the burners. Just because the flames appear pretty does not mean they're burning properly.

    I'm positive that no manufacturer would condone altering the burners in any way.

  • mojavean
    12 years ago
    last modified: 9 years ago

    Do a search for Garland M8 small style hood orifices. For instance, a #56 orifice would be sold as Garland M8-56 Orifice. They are widely available on the net at restaurant supply sellers.

    Here's one that the seller seems to have in stock.

  • smshelton
    12 years ago
    last modified: 9 years ago

    Mojavean, thanks for the helpful info and link.

  • mojavean
    12 years ago
    last modified: 9 years ago

    You're welcome!

    Nice pics, Billy. Such torture to have to go to Rome in early spring, huh?

  • billy_g
    Original Author
    12 years ago
    last modified: 9 years ago

    Hey mojavean,

    It was great to be in Rome but was there less than 48 hours so not as much fun as the photos would suggest. I was in London all of the past week and that was more civilized in terms of being there long enough to get some sleep and enjoy the trip. It's good to be home and cooking on the CC instead of eating hotel and conference food.

    Billy

  • billy_g
    Original Author
    11 years ago
    last modified: 9 years ago

    I forgot to post a photo of the burner after I put stove paint on it, which is good to 1200 degrees F.

    Billy

  • mangiamo
    11 years ago
    last modified: 9 years ago

    Hi Billy

    Looks great. You should start a mail order company!

    Warm regards

    MM

  • rob from nj
    11 years ago
    last modified: 9 years ago

    I'm considering trying this on one of our four burners. We're able to cook rice just fine with the burner adjusted just above clicking, but a lower burner would be nice.

    Questions:

    The orifice that mojavean linked to says it is an LP orifice that is also used as a NAT orifice on some equipment. Is there a difference? We have natural gas.

    I'm thinking this might look neater if the muffler putty were dispensed through a syringe. Is it low enough viscosity enough to draw into a syringe?

    I'd probably start by just plugging the outer ring and progress from there if not satisfied. What would be the best orifice for this?

  • mojavean
    11 years ago
    last modified: 9 years ago

    There is no difference in the orifice. What changes is the BTU output of the burner fed via that orifice. LP is 2.5 times more energy dense than Natural Gas. A 55gauge orifice will be capable of supplying between 7350 and 9710 BTU/hr, depending upon the pressure of the gas. The same orifice feeding LP will deliver almost 19000 BTU/hr. You have to match the orifice with the type of gas you are using to cook with, and the number of burner holes in the burner.

    What the orifice does is limit or top-stop the amount of gas supplied to the burner. The valve at the burner itself is a further control. What you are trying to do is not put so big an orifice in the burner that under a knob-fully-open condition-you see "jetting" out of the burner, which can result in improper combustion and even possible extinguishment of the flame.

    Too small an orifice and you will not get enough flow to the burner to keep the flame touching the sensor electrode, which will result in the clicking you hear and also failures to light.

    Billy used a 56 and has not reported any problems. If you decide to only occlude the outer ring of the CC and go for a higher potential BTU using NG, then I would probably start with a 52 gauge orifice assuming Natural Gas, but that is your call. Remember, it is your science project!

    Although the diameter of the orifices in the ranges we are talking about, between 56 and 50, change fairly linearly, remember that drill sizes aren't perfectly linear in that regard. Also, unless I am mistaken, the variable that will control the amount of gas flow from the orifice(all else being equal) will be the area of the opening, not the diameter. Remember area increases as PI() * r^2.

    At this point in your science project it will be up to you to determine the optimum size for the task. The good news: the orifices are cheap so you can pick up a selection of sizes without being much out of pocket. Also, remember that the orifice is always overridden by the gas valve attached to the knob. If you don't like the looks of things, just turn the valve off.

    One more thing you will need to worry about that Billy didn't is the notch cut in the burner cap that links the inner and outer rings. That notch is obviously the flame path to feed the flames over to the back side of the burner. Be careful not to block that notch with your muffler putty. You need it open so that the middle ring can ignite smoothly, without any annoying and dangerous flash ignitions.

  • beefstew01
    11 years ago
    last modified: 9 years ago

    @billy g: How many ppm of CO (carbon monoxide) is your jury-rigged Culinarian simmer putting out?

  • alexrander
    11 years ago
    last modified: 9 years ago

    You also might be able to squeegee the putty in from the back side, just tape over the holes you want to leave open so that no putty gets into them. In fact you could mask the inner holes on the outside of the burner as well- no matter how you apply the putty.

    Make sure you leave that connecting slot/notch open to the middle ring as Mojavean said.- if you're only blocking the outer holes. And adjust the air shutter.

  • rob from nj
    11 years ago
    last modified: 9 years ago

    Thanks for your reply, mojavean. I think I'm good to go.

    It would be difficult to mask the holes from the inside as there isn't a lot of room but I'll consider that as I want this to look good - our range is visible from the dining and living rooms.

    There is another thread here somewhere where Trevor said that a Capital engineer came to his store, plugged all but the inner ring with muffler putty and installed a #55 orifice to create a simmer burner (curse the search function on this forum). What makes you think this might be spewing CO, beefstew01?

  • tyguy
    11 years ago
    last modified: 9 years ago

    If masking is hard to accomplish from the inside, you could try using playdo or plumbers putty or something similar to temporarily plug the holes you ultimately do not want plugged. When done just take playdo off, maybe clean the holes out a bit and you are good to go.

  • beefstew01
    11 years ago
    last modified: 9 years ago

    @robj: "What makes you think this might be spewing CO, beefstew01?"

    I never stated it was spewing CO--I only asked the level. No one can tell if it is, but without a combustion analyzer or proper agency testing, @billy g can't say exactly what this burner is emitting.

    Frankly, it's worrisome and outright dangerous to foment changes to this, or any, burner, especially on an open, documented forum.

    Notice how trevor and joey and surgit have been absent from this thread? There's a reason.

  • rob from nj
    11 years ago
    last modified: 9 years ago

    We have 4 CO detectors and a parakeet but I understand your concerns and had noticed the obvious lack of participation.

    Frankly, if Capital had offered a simmer burner as an option, we'd have probably paid a little extra for one.

    A retrofit kit would be nice.

  • foodonastump
    11 years ago
    last modified: 9 years ago

    I kinda see your point, beefstew, but I'm wondering if it's really more risky than mfrs giving consumers DIY instructions on how to adjust valves and air shutters to acheive a flame that is primarily blue and doesn't "lift" off the burners. Even if these adjustments are left to authorized service (as I personally feel they should be) are the techs sent out with a "combustion analyzer" or are they going by visuals themselves? (I don't know the answer to this last question.)

  • TonySak
    11 years ago
    last modified: 9 years ago

    for what its worth...

    I just converted our CC from Propane to NG. After re calibrating the air shutters and the simmer adjustment. NG is a far more consistent simmer and flame in general. If there is no draft the simmer flame is down to the absolute lowest flame possible. Any lower and there would not be enough gas pressure to light all the ports. The flame also shoots up higher past the grates with NG. I'm sure its the difference between LP and it expanding, vs more volume of already expended NG.

    Side note. My CC is about 6 months old. Performs great, but I am noticing rust starting to form on the burner ports. Anybody else? Its strictly a cosmetic issue.

  • amcook
    11 years ago
    last modified: 9 years ago

    As with any DIY project, proceed at your own risk. IMHO, this particular modification is of minimal risk. The end result is no different than the simmer burner they sent out with the first batch of ranges. If the flames are blue and there are no black carbon deposits on the bottoms of your pans, then combustion is probably as complete as any of your other burners which means you would not be increasing the amount of CO production. The reduction of oriface size would in fact decrease the potential maximum CO production. Again, as long as it is adjusted so the flame is a nice blue. I'd have more concerns with a full sized burner that had the shutter shut down too far thus causing mostly orange flames. The amount of CO produced in that case would be much greater than a modified simmer burner ever could.

  • TonySak
    11 years ago
    last modified: 9 years ago

    I was just looking at the pictures again. I'm not sure if just having the middle ring of ports open and the inner and outer rings blocked would work. I'm not sure what the requirements are for the auto ignition feature, you might get constant sparking if that most inner ring isn't there.

  • mojavean
    11 years ago
    last modified: 9 years ago

    It won't work if the burner port adjacent to the flame sensor/spark ignitor electrode isn't open, but I don't think that robj is proposing to do anything like that. He stated that he would block the outer ring and work inward, or at least that's what I inferred.

  • rob from nj
    11 years ago
    last modified: 9 years ago

    Yep - that's what I meant.

  • billy_g
    Original Author
    11 years ago
    last modified: 9 years ago

    Beefstew,

    The modified burner is spewing less CO than you are... LOL! This is not rocket science, and I have a 1400 CFM hood and multiple CO detectors throughout the house.

    I only wish Capital had put a combustion analyzer on my burners before they shipped the rangetop to me. The question you should be asking is how much CO the "factory-adjusted" burners emitted when they were clicking on and off.

    None of the techs use a combustion analyzer when they adjust the air shutter and simmer, and it is not needed here.

    Seriously, Capital used to ship a simmer burner with this exact configuration.

    For those who want to get a smoother surface on their modified burner, you could put a couple of coats of the muffler goop on the burner and sand it down smooth before painting. My photos with flash show all the warts in the burners. In actual use you wouldn't notice the dimples in the modified burner.

    Billy

  • JackPK
    11 years ago
    last modified: 9 years ago

    Capital's got this fix coming!!!

    I am a newbie to GW and this is my first post. I am building a new house and was looking to put in a high end rangetop in the kitchen. I came across the CC while searching but had no idea about the brand. So I searched the GW for info on the Culinarian. Thanks for all the info and feedback from everyone, they were very helpful. However, I was concerned about the lack of a true simmer burner (contrary to what Capital's marketing says) as noted in various threads here.

    So I called Eurostove today to find out if this is a real problem and if Capital has fixed it by now. Trevor Lawson informed me that it is a known problem. However, he said Capital is working on a real simmer burner for the Culi, an 8K or 9K burner, that just contains the inner burner holes. This would be offered as a retrofit kit to current owners. Expected availability is 4-6 weeks from today, so that puts it around end of July 2012. Perhaps Capital's engineers saw Billy's fix and thought we can do it too.

    The simmer issue was one thing that bugged me about going with the CC, but now that is being fixed, I think I will buy the 48" CC with the BBQ when the simmer is incorporated into the design.

  • wanderindiana
    11 years ago
    last modified: 9 years ago

    The putty is curing in the burner...

    I read everything about a Capital solution here, and I didn't see a Capital solution imminent, so I'm going through the above procedure.

    If I had it to do over, I'd _completely_ cover the outside of the burner with that blue masking tape, then poke holes from the inside and round them out from the outside. You can see the clear spot where I had a piece of tape on the flame transfer slot. At some time I might put something black on the burner to improve the appearance.

  • wanderindiana
    11 years ago
    last modified: 9 years ago

    ... and it works GREAT!

    One oddity is that the shutter adjustment didn't make any difference at all. I got good combustion in all shutter positions on both high heat and on simmer, and some in-between heat settings.

    Another oddity is that it takes about 15 seconds from "gas off" to "flame out" even from the simmer setting.

    I adjusted the simmer down to as low as I wanted, and could have gone lower but no real point to it.

    Overall, I am thoroughly satisfied. Many thanks to everyone for their contributions.

  • beefstew01
    11 years ago
    last modified: 9 years ago

    I'm wondering why all the muffler putty enthusiasts just don't buy a real commercial range for a fraction of the cost of a Culinarian-- because either way, in case of a fire, the warranty and home owner's insurance are void.

  • Jon T
    11 years ago
    last modified: 9 years ago

    As one of the original CC owners I find it amusing that Capital is 'finally' offering a burner with fewer holes. That is exactly what they offered as the standard arrangement when they first started taking orders for the CC! I ordered a 30" CC, and the standard arrangement was one ~8K burner (inner ring of holes only), one ~15K burner (inner and middle rings of holes), and two 23K burners (all three rings of holes). Based on the video that...ahem...Trevor posted showing a sheet of paper resting - and not burning - over a 23K burner set on simmer, I switched my order to all 23K burners.

    So would I switch one burner back to an 8K burner? I'm not sure. I do occasionally wish I had a lower simmer. I would never put a simmer on a front burner, so the smaller burner would become one of my two rear burners. But when cooking for a large crowd I find myself pushing boiling duties to the rear. Hmm, any chance the 15K burner will make a comeback!