

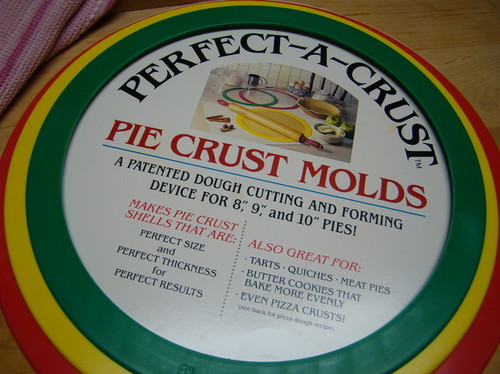
1987 Vintage Pie Crust Molds
shirl36
Found these on E-bay.....bidded and won.....were not sealed in a package, but appeared to be unused, directions card was spotless clean. I have enjoyed using them. I have pie crust for 6 pies rolled out and froze.
Just wondering how others use them. I used to suit myself but thought perhaps I was missing something. Sometime ago there was some conversations on these molds. Have not been able to go back and find the threads. I am such a collector of food gadgets.
Shirl
[
](http://ths.gardenweb.com/forums/cooking/msg0616471012220.jpg)
Browse Gardening and Landscaping Stories on Houzz See all Stories
Product Picks
Guest Picks: Pi Day + Pie Stuff = Yummy Fun
Add these tools and accessories to your baking arsenal and watch smiles multiply
Full Story
Kitchen Design
Love to Cook? We Want to See Your Kitchen
Houzz Call: Show us a photo of your great home kitchen and tell us how you’ve made it work for you
Full Story

Glam Style
11 Ways to Go for Baroque
By Becky Harris
Apply a fanciful style in the right dose to make your room shine
Full Story

High Point Cabinets is a custom cabinet builder located between Apple Creek, Fredericksburg and Mt. Hope, Ohio,... Read More








With over 50 years of experience, we take pride in what we do, and we work hard to meet each client's... Read More
Oh, it just makes me feel ancient that something 1987 is vintage!
LOL But, I am glad you are enjoying them!
1987 is vintage? ? ? ? ?
Oh my! ! ! ! ! !
That's almost scary!
:>)
Rusty
Very good for getting good even thickness crusts ... but if 1987 is "vintage, I'm not antique, I'm prehistoric.
I started using them in 2007. This is the simplest and quickest method for rolling out 1 or 100 crusts. These were popular in professional kitchens when they were first available.
The easiest way I found to use them is different than the suggested method on the back of the cardboard cover.
1. Use a LONG non-tapered rolling pin for best results.
2. Put down two sheets of plastic wrap, overlapping, so you have enough space for the rings to fit on and some space beyond the rings. If you can locate rolls of Reynolds Extra Wide Plastic Wrap (50% wider than a regular roll), you will only need one sheet (and well worth the effort and cost to use one large sheet).
3. Place dough down on top of the plastic wrap.
4. Place two more sheets of plastic sheets to cover the dough.
5. Put the ring down over all the sheets of plastic wrap. This way the ring stays clean.
6. Roll out dough that is sandwiched between the sheets of plastic wrap until the ring is filled.
7. You may get a bit frustrated at first because as you roll the plastic wrap may bunch, or the ring will move as you roll the dough out, but hang in there, it all works out and you will have a perfectly round crust.
8. Run the palm of your hand over the entire crust when finished and make sure it's level all around.
9. Using the plastic wrap, you do NOT need any extra flour (bench flour) and it's easy to transfer to your pie plate.
10. You may want to transfer the crust to a cookie sheet (while still in the plastic wrap) and chill for 20-minutes or so until it firms up again.
11. When you want to put it in the pie place, put the rolled crust on your counter and carefully peel off the two top sheets of plastic wrap. Simply pick up the bottom plastic wrap at two corners and flip it into the pie plate.
12. Alternative method.... I have a small inexpensive thin rimless cookie sheet I bought specific for the transfer of the crust. Put the pastry, plastic side down, on the cookie sheet. Put your pie plate on top, centering it. Flip cookie sheet and pie plate. Remove cookie sheet. Gently press pie dough into your plate, plastic still attached. When you are satisfied with the fit, gently peel off the plastic wrap. Your hands, the ring, and the counter remain clean - as an added bonus ;-).
NOTES:
-If the plastic wrap is sticking to the crust because the ambient temperature in your kitchen is too warm, place it back into the refrigerator for a few minutes to firm again.
-I normally would fit the crust into the pie plate, flute, and put the top sheets of plastic wrap back loosely over the fluted crust and refrigerate it until ready to fill.
-If it's a double crust pie, roll out both crusts, leave one flat in the refrigerator, and fit the bottom one into the plate - leaving the plastic wrap intact in the refrigerate until ready to fill.
-If the plastic wrap bunches or gets caught in the dough, just pick it up off the top of the dough, smooth it out again and continue rolling. This may be a problem if you have a short rolling pin.
I hope you enjoy your Perfect-A-Crust rings as much as I have. It's too bad they quit manufacturing them. They were a really popular selling item at King Arthur.
-Grainlady
I have a board that has circles marked on it for the sizes of pie crusts, and that's what I've been using. I had never heard of the 1987 pie crust molds.
I can sort of understand how 1987 is considered vintage by now. Last week-end I got some shirts out of storage that I had bought in the early 1990s, and I have decided that they are now "vintage" enough for me to wear them again. It if it 20+ years old, it can be back in style.
In 1987 I was studying Interior Design at UT Austin and wasn't making pies, although I did make a lot of pizzas. I wonder if the pie mold could be used for pizza dough. I have more trouble getting pizza dough round with an even thickness than I do pie dough.
Lars
This really annoyed me to read as I was watching for them on eBay for years! But wouldn't you know, they're available on Amazon. So there's a set headed my way, and another set headed towards the LA area for someone else who was looking for them when we were kids back in 2009. (Shhhhh!!)
Yesterday, my pie crust melted as I was rolling it out. Yes, I guess my kitchen was too warm. :) There was definitely no way to rescue it other than patching and praying. Grainlady, you have me sold! The ability to move and rechill the dough without the usual mess I get with cling wrap (i.e., with the rings to contain the shape) is more than worth it.
And FOAS, thank-you for saying Amazon. :)
Edit: Most of all, a big thank-you to Shirl36!! I meant to at the top, and somehow got lost. I'm good enough at the rolling, but these look to make it all that much easier. ;)
This post was edited by plllog on Mon, Jun 16, 14 at 19:50
Thank you all for your comments!!
Grainlady...I will try your technique next which is real soon like this week. Just purchased a long 18 "tapered rolling pin and it makes the rolling out much easier.
I have some 16" square wax papers for wrapping sandwiches I will try to roll out the dough. If don't work I will use plastic wrap. Maybe I can eliminate the flour mess I have everywhere. From KA a few years back I have a thin metal peel I use to transfer pie dough and such. Mine is larger than the current ones KA sell. And I also do roll out pie dough and chill in frig till I have everything ready to assemble.
I bet my MOM would laugh if she could see me now....the ordeal I go thru to cook. For pies she would go to pantry, reach into a 5 gal can of flour and with her hand measure out 3 cups flour, then into the lard can and again with her hand take out so much lard, add a bit of water and come out with the best pies ever.
One more thing anybody.....does anyone weigh out their pie dough before starting to roll out, eliminating to much excess dough to be cut off. Last week when using the Perfect-A-Pie rings I work around this process, made notes and it worked pretty good.....
Shirl
Shirl, the waxed paper should be fine. I don't have the rings but I always roll out my pie crust disks between two sheets of waxed paper, remove the top sheet and flip the uncovered side down onto the pie pan, then remove what was the bottom sheet.
Sigh. I'm so old fashioned. My only newfangled rolling gadget to date is a Silpat instead of a board...
Shirl, I've been weighing most of my baking ingredients in grams (because they're smaller, and decimals of ounces is a bother). Weigh your flour, especially if it's not sifted, on different days and you'll get wildly different amounts. :) King Arthur has this handy dandy weights chart, but, of course, it is geared to their products. The baker's standard rule is 120 g of flour in a recipe cup.
BUT, if you're happy with your pastry, the best thing to do is work backwards. Measure your ingredients as normal, then weigh them and write them down. Roll out a sacrificial pie crust made with the ring (one that you don't mind messing up, though it should be salvagable, especially with the cling wrap method) fold it, and weigh it. Weigh the wrap separately, but it should be negligible. Repeat on a day with different heat and humidity. Then do a little algebra to know how much is in an 8" or 9" or 10" crust.
I bet your mom, who sounds amazing!, was compensating for all kinds of factors while she was measuring her ingredients by feel. I also bet she had her share of oopsies, just before you were born, or old enough to notice. There are some things that just get a lot easier by the time you've made a hundred, or a thousand. You know what it's supposed to be like and can feel when it's right or wrong. Make a pie a day for a couple of years, measuring out your ingredients by the handful, and I bet you'll learn the knack. :)
Meantime, I've gotten too lazy to make pretty edges, so am looking forward to trying the pie rings. I have to say I do remember seeing them when they were popular, but I was working crazy hours and saw no need for gadgets just to make a pie! Now I'm all for it. :) Thanks, again.